Clothing Hacker

Just another WordPress site

Category: Fabric Mart (page 1 of 2)

Suki Kimono

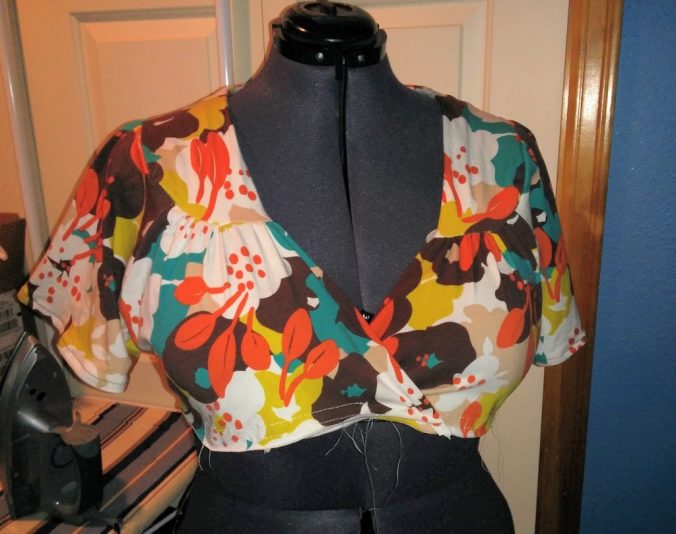
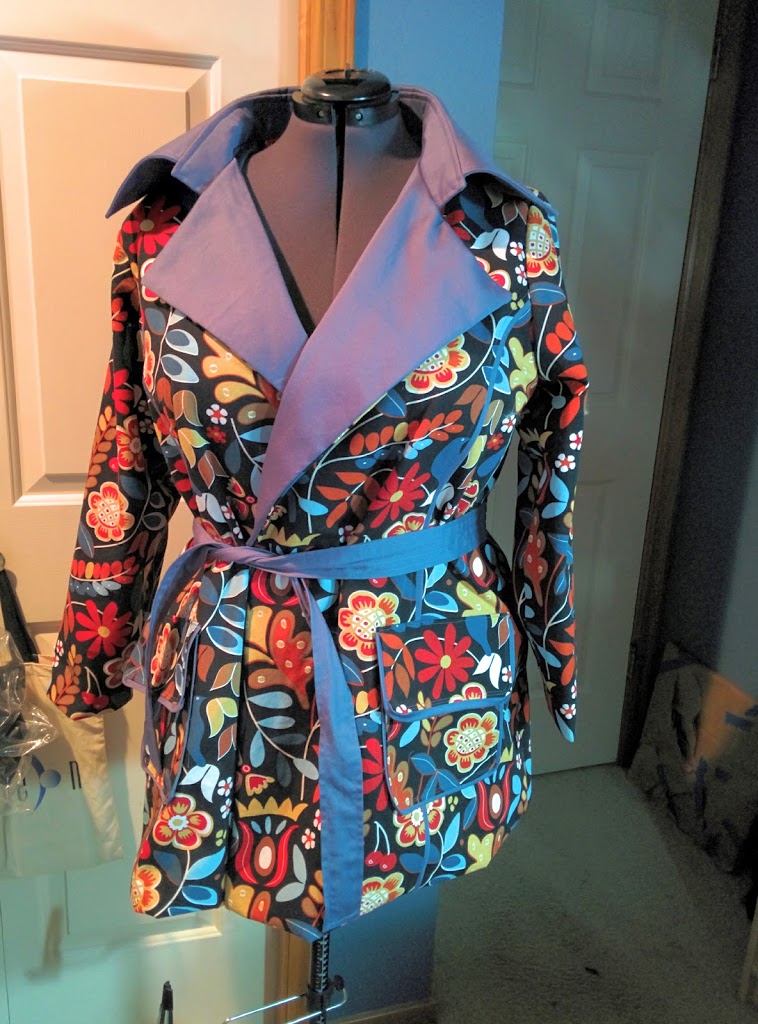
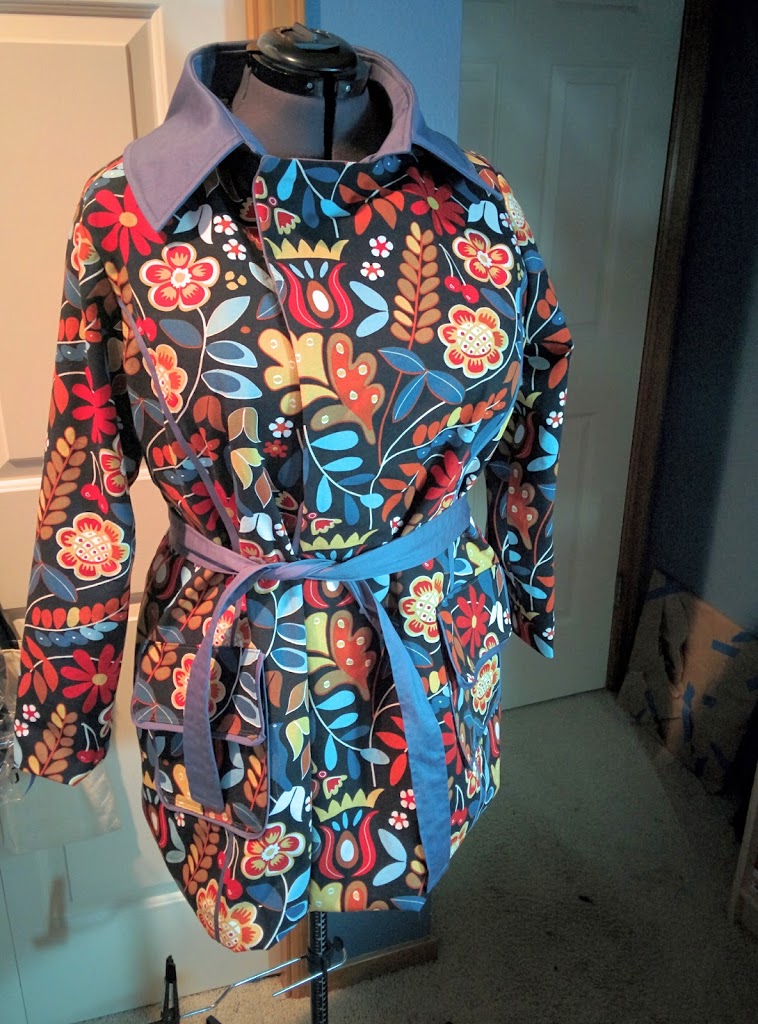
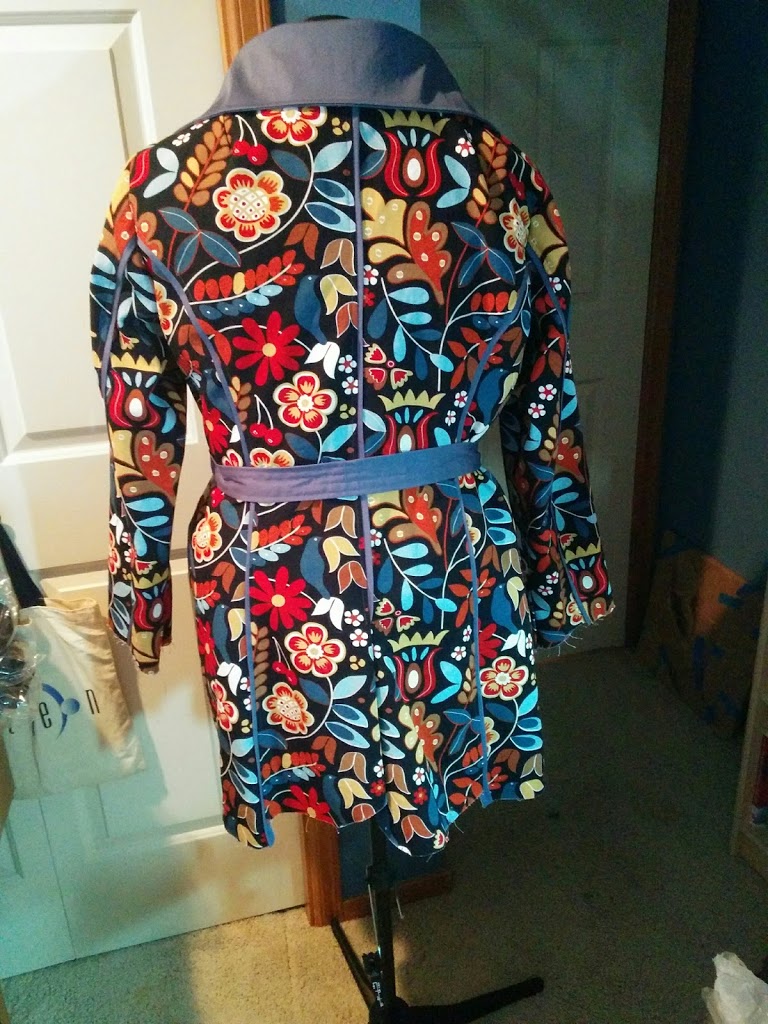
I had the great pleasure of getting to pattern test the latest pattern from Helen’s Closet, the Suki Kimono.

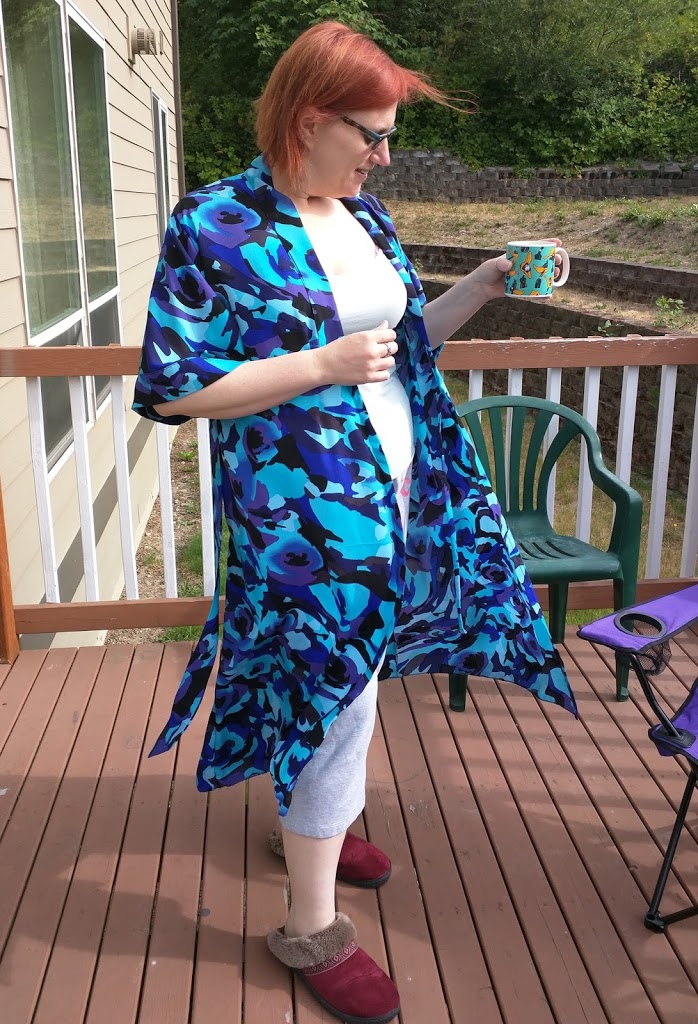
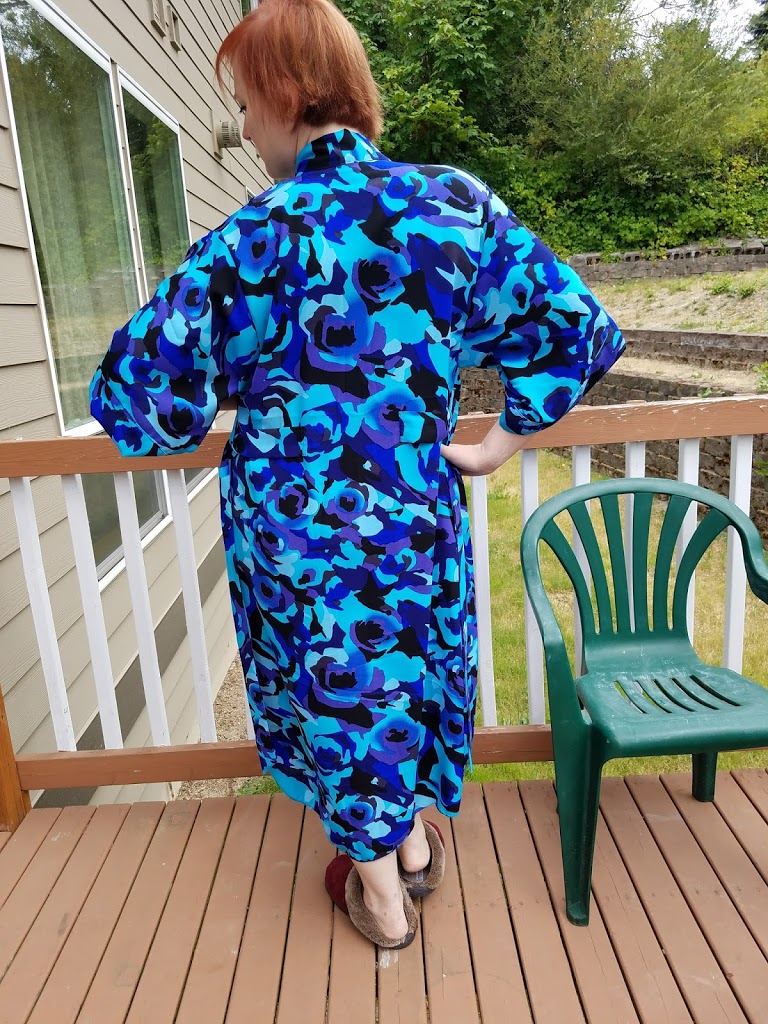
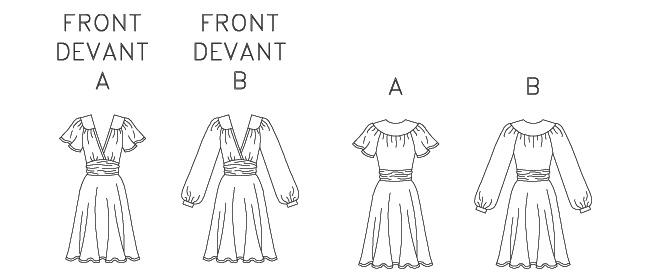
The official description is as follows: The Suki Kimono is a luxurious and comfortable robe, perfect for everyday use. It wraps around the body for a flattering waist fit and flares out over the hips. Kimono sleeves offer a classic look while still being a practical shape and length for getting ready in the morning. Inner and outer ties keep this robe closed so you can move around freely. The outer ties are anchored to the back of the robe so you will never lose them and inseam pockets ensure your phone is always at hand. Two lengths are provided and you have the option of contrasting front bands, sleeve bands, and ties. The Suki Kimono will surely be your new favorite lounge-wear!

I held off on posting about my Suki because I had hoped to use it as part of an outfit for The Monthly Stitch’s last contest for Indie Pattern Month.  But alas, I haven’t had a lot of sewjo lately, so I didn’t get my “work from home” outfit finished in time.

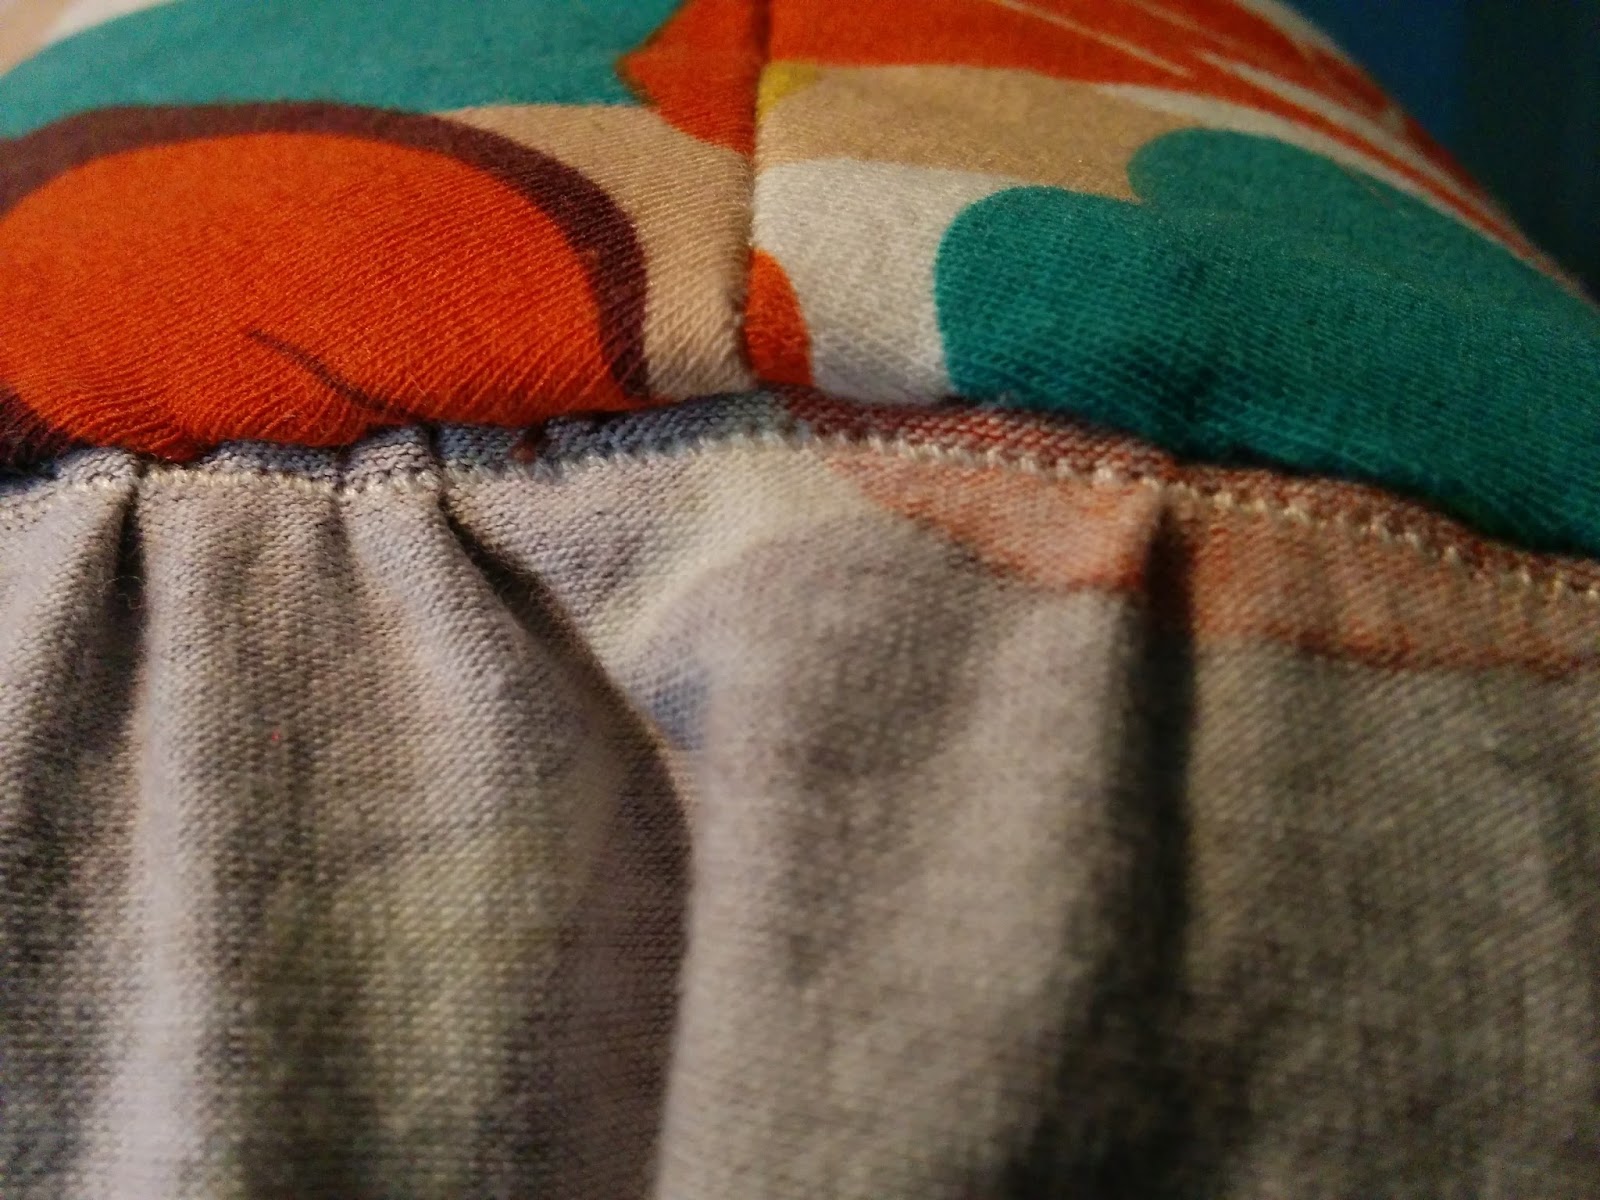
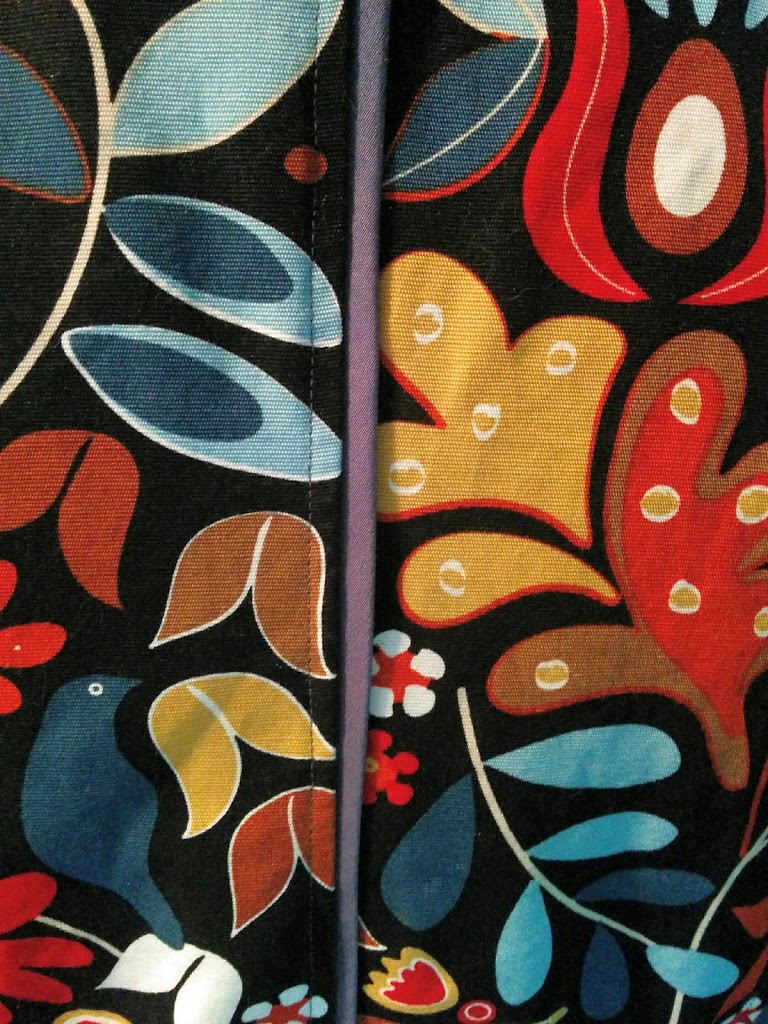
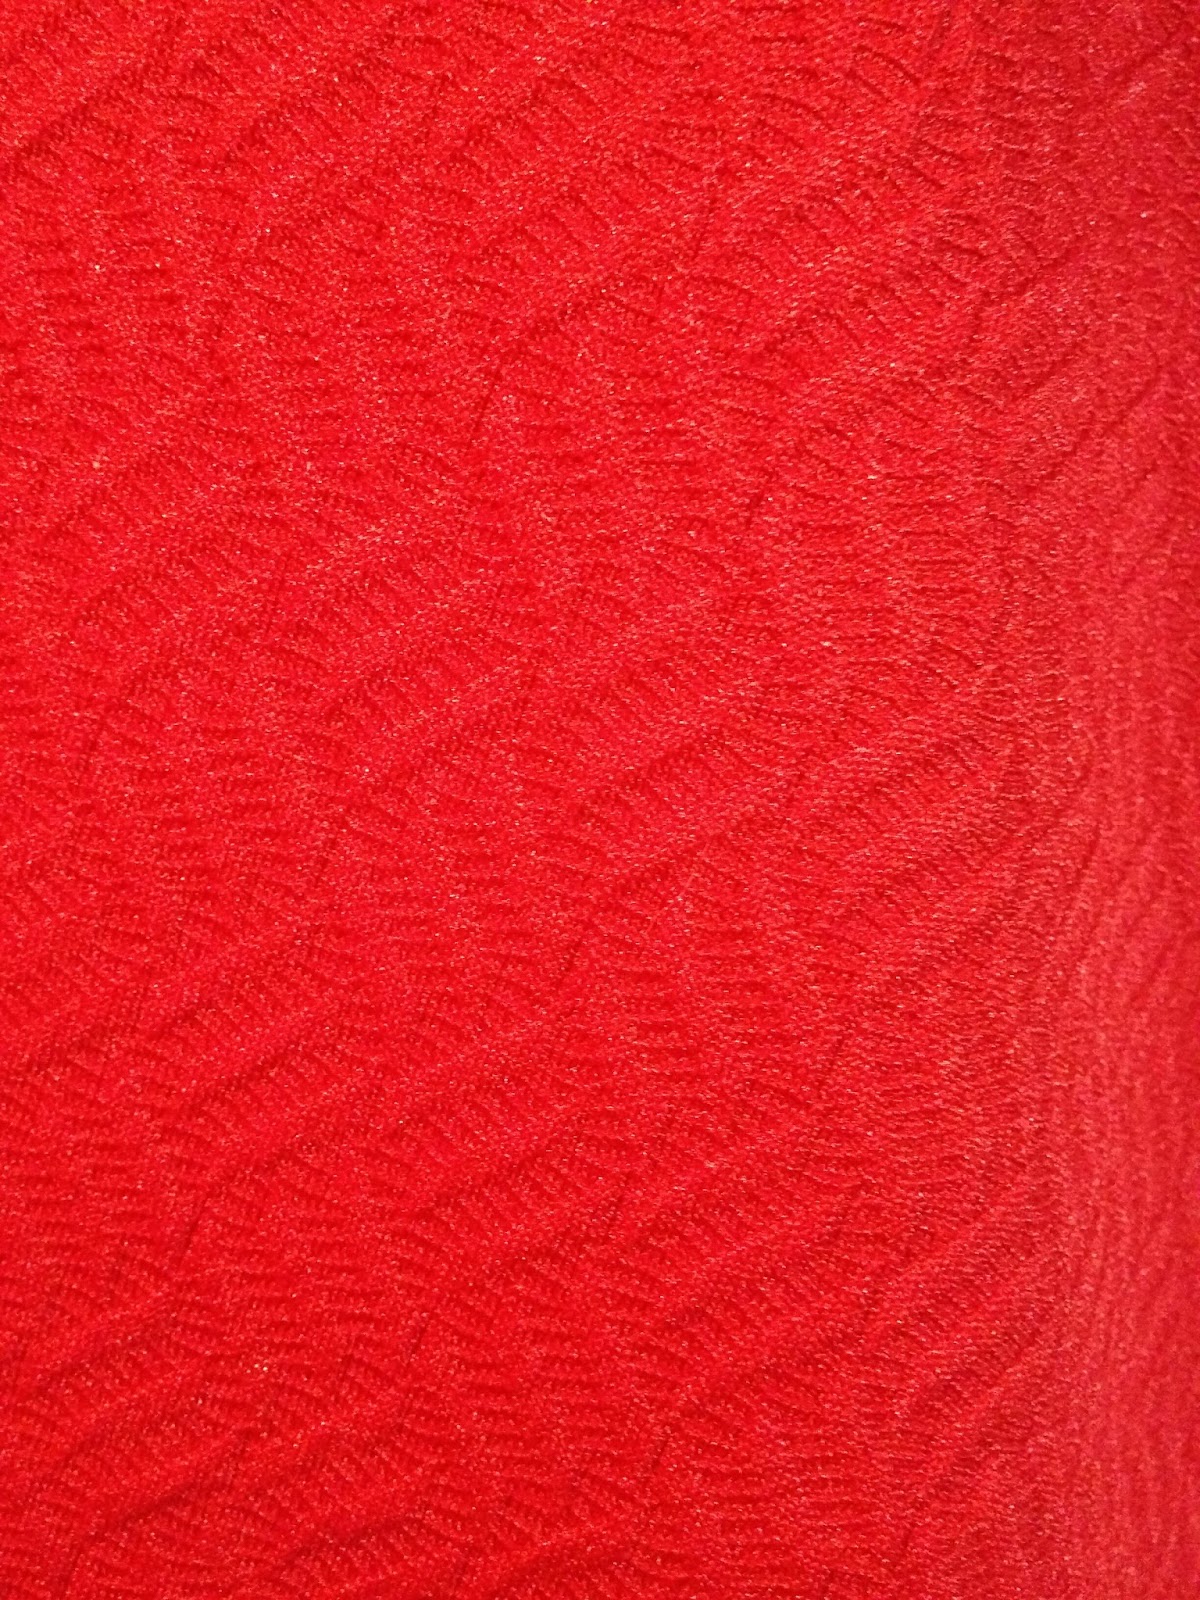
The fabric I used was a 4 yard pre-cut poly crepe de chine I got from Fabric Mart for $3.20 back in February.  I didn’t love the fabric once it arrived, but I decided that made it perfect for this test, in case things didn’t work out.  It frayed more than any other fabric I’ve worked with so far.  Although, to be fair, I have way more experience with knits than wovens.


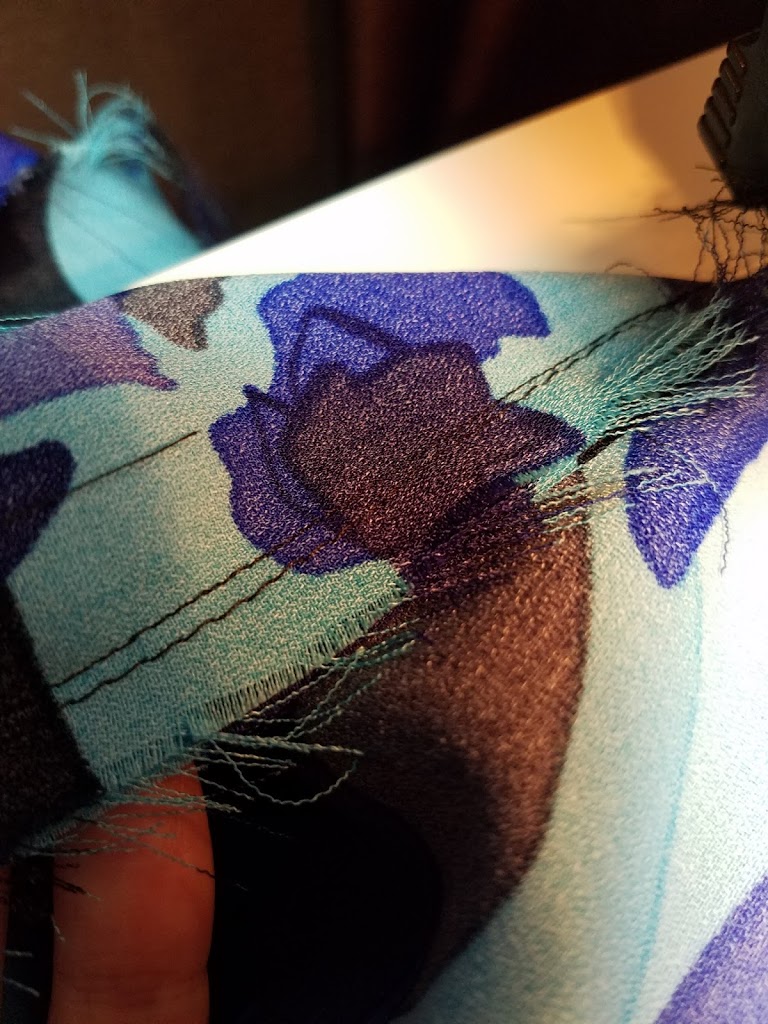
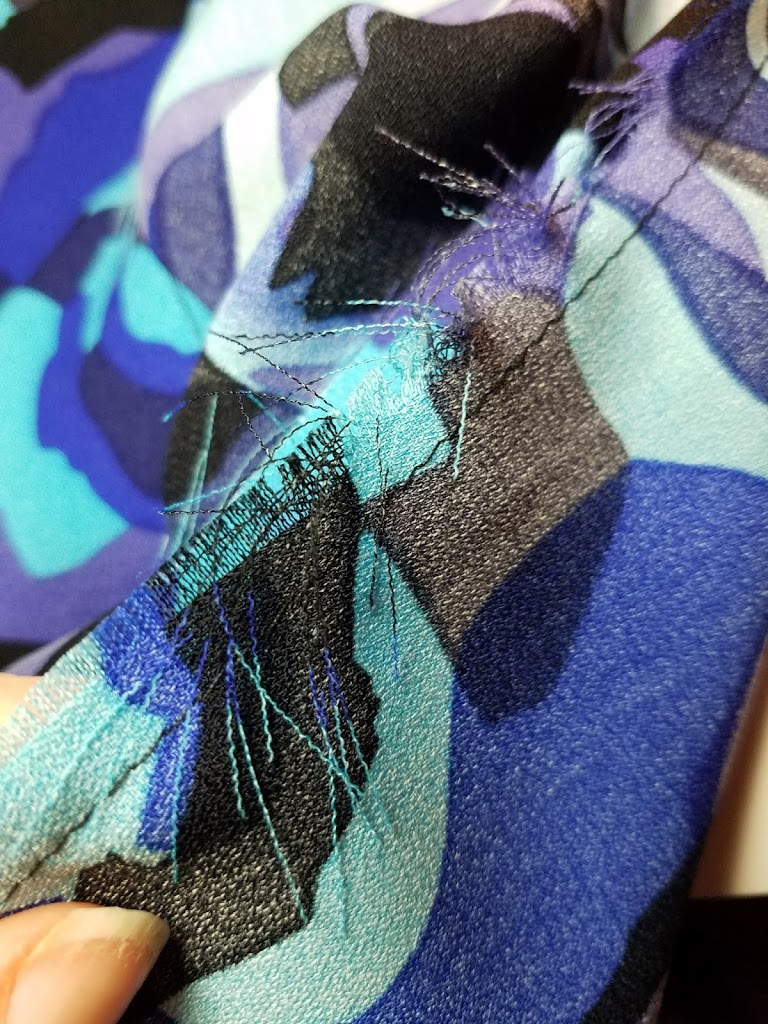
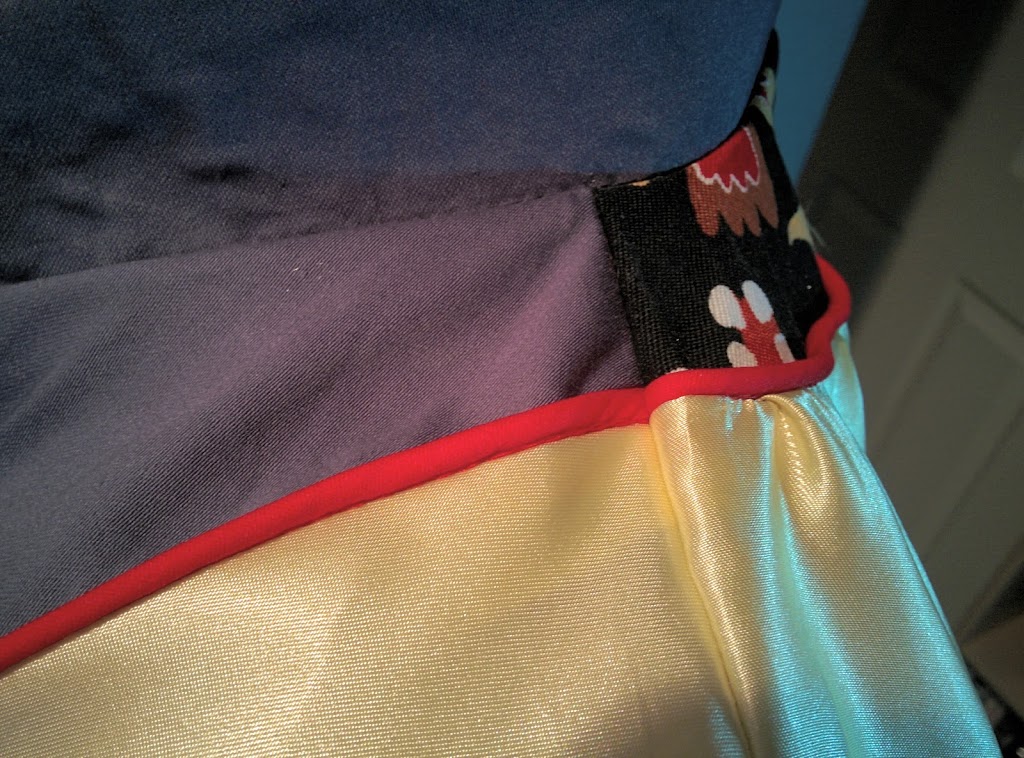
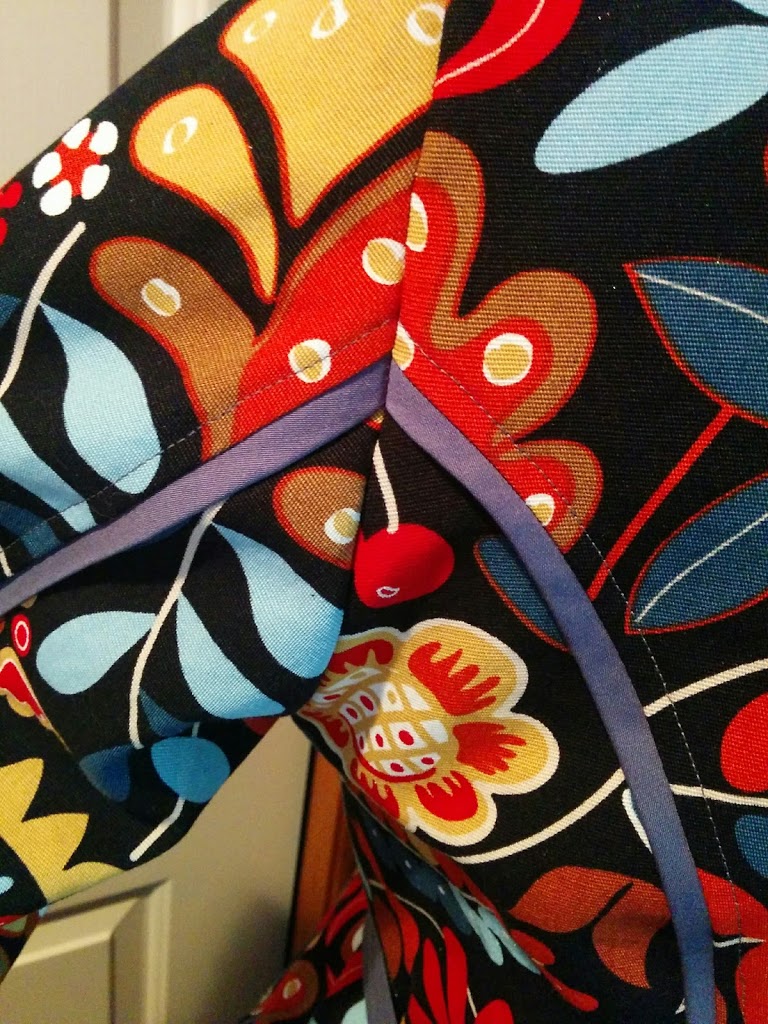
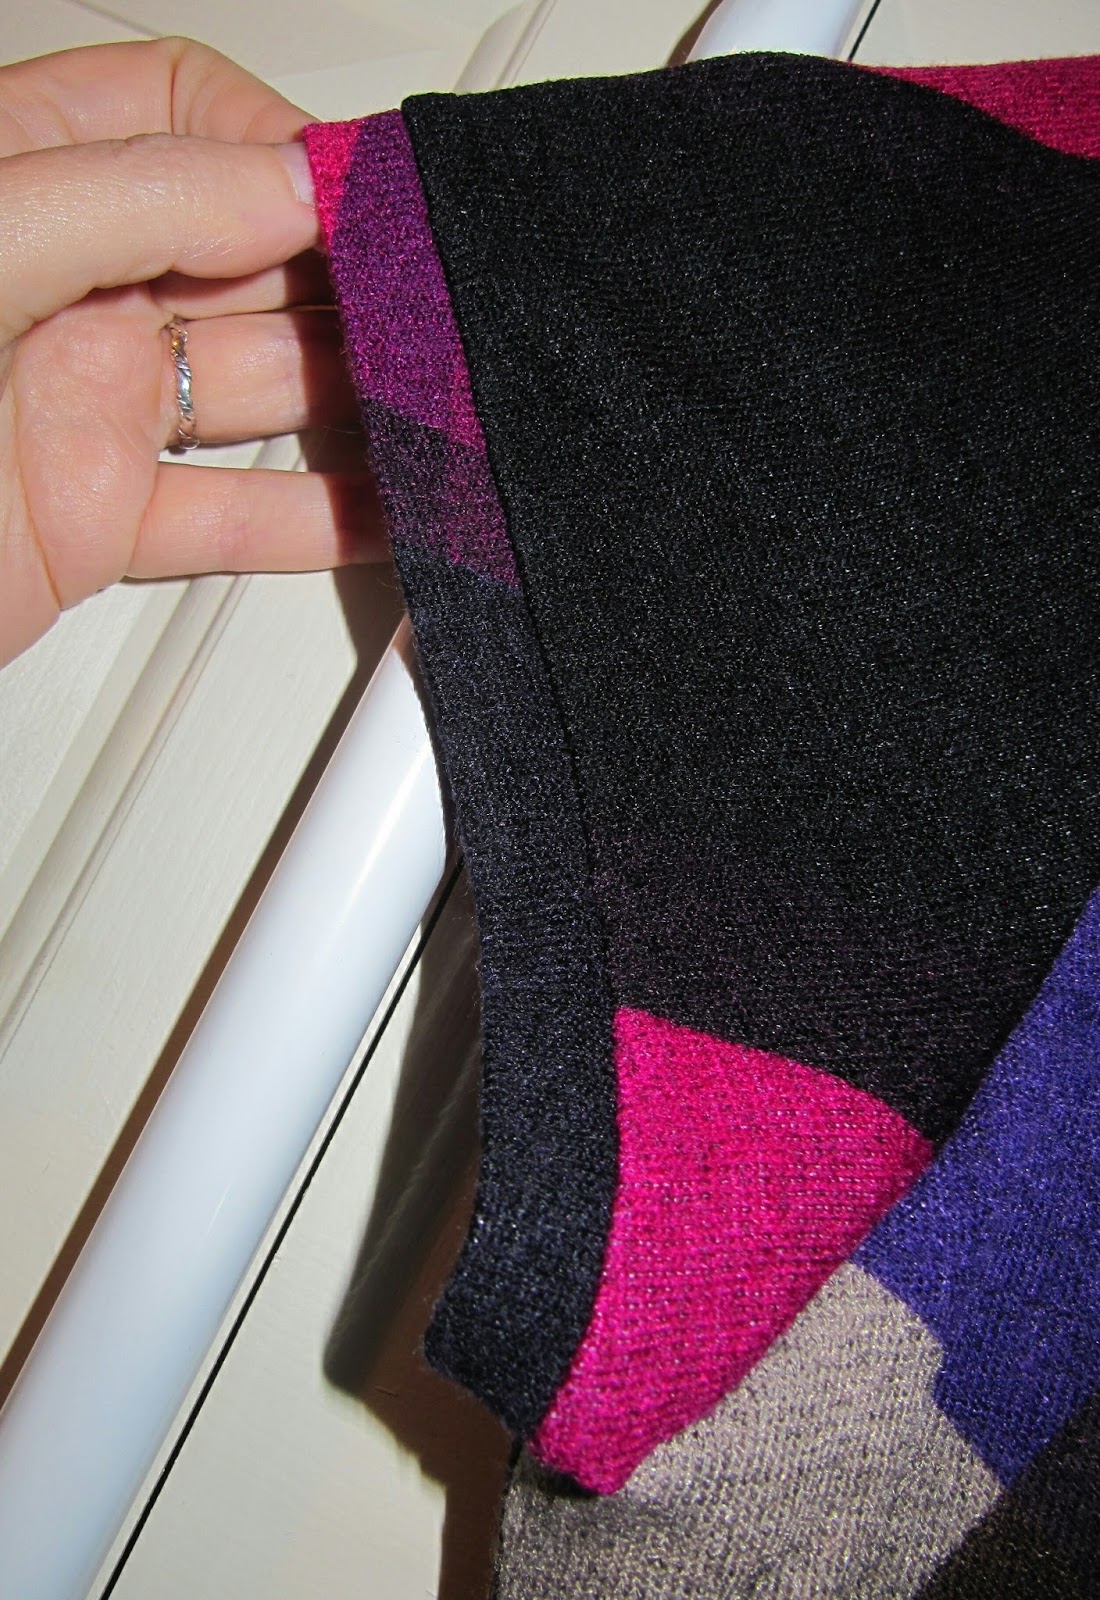
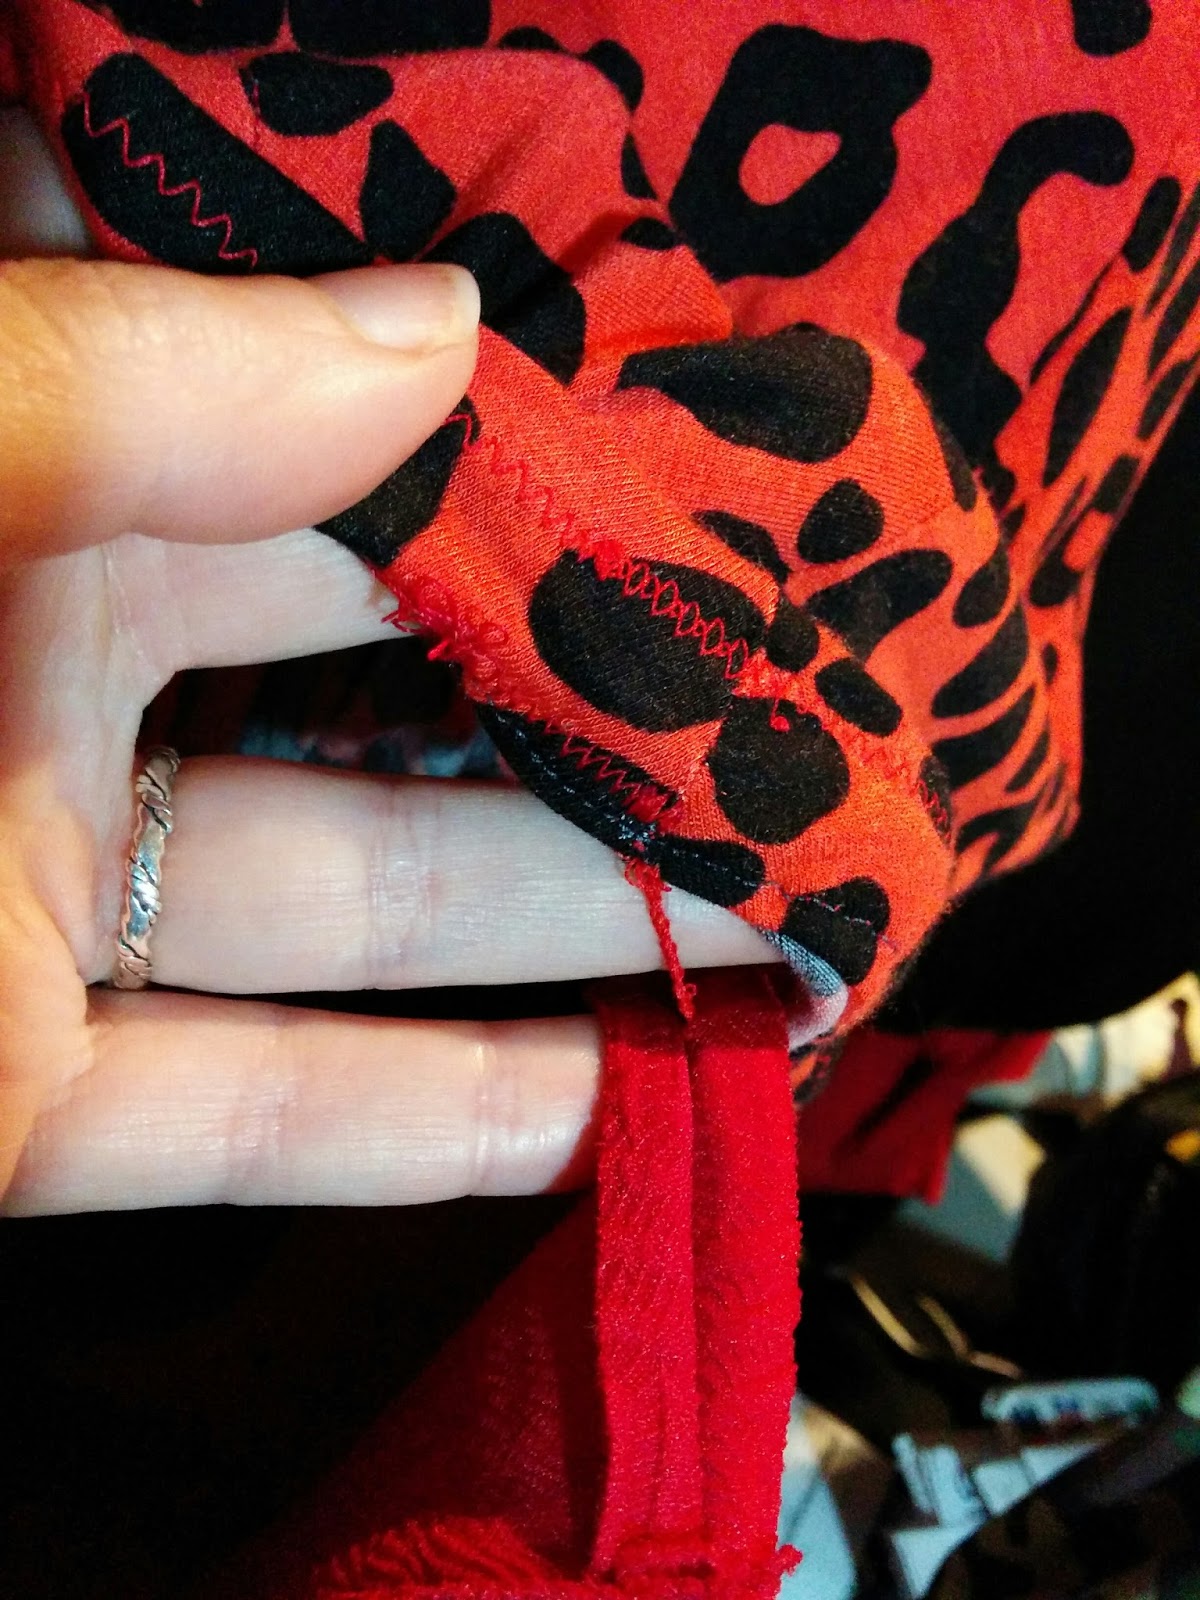
Not the clearest photos, but yeah, that’s fully half of the seam allowance frayed away.  🙁  I did french seams on the body and I had to increase the seam allowance to allow for the fact that my seam allowances frayed away.  Helen advised using spray starch next time I’m working with a woven that frays.  I’ll definitely need to remember that tip!

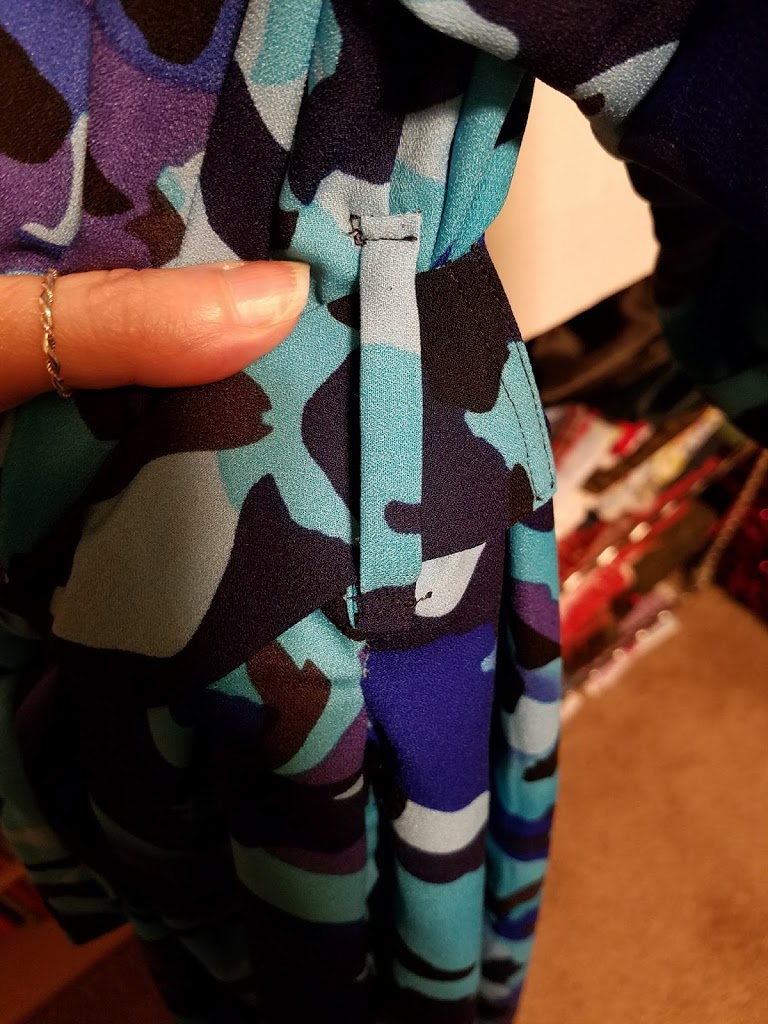
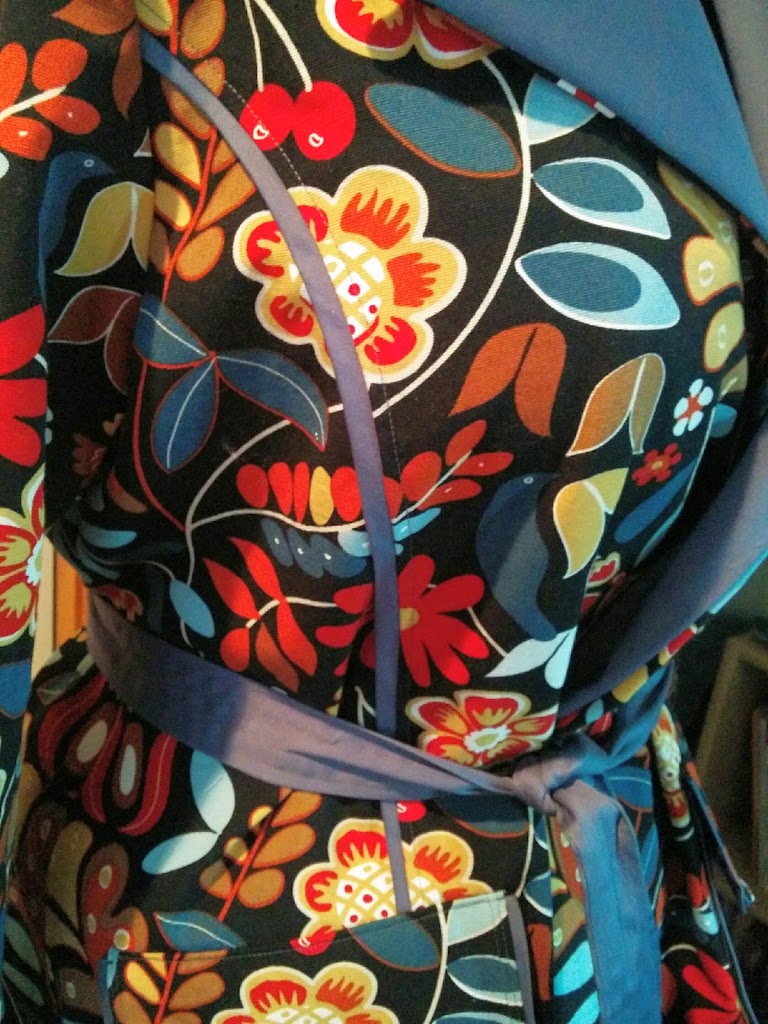
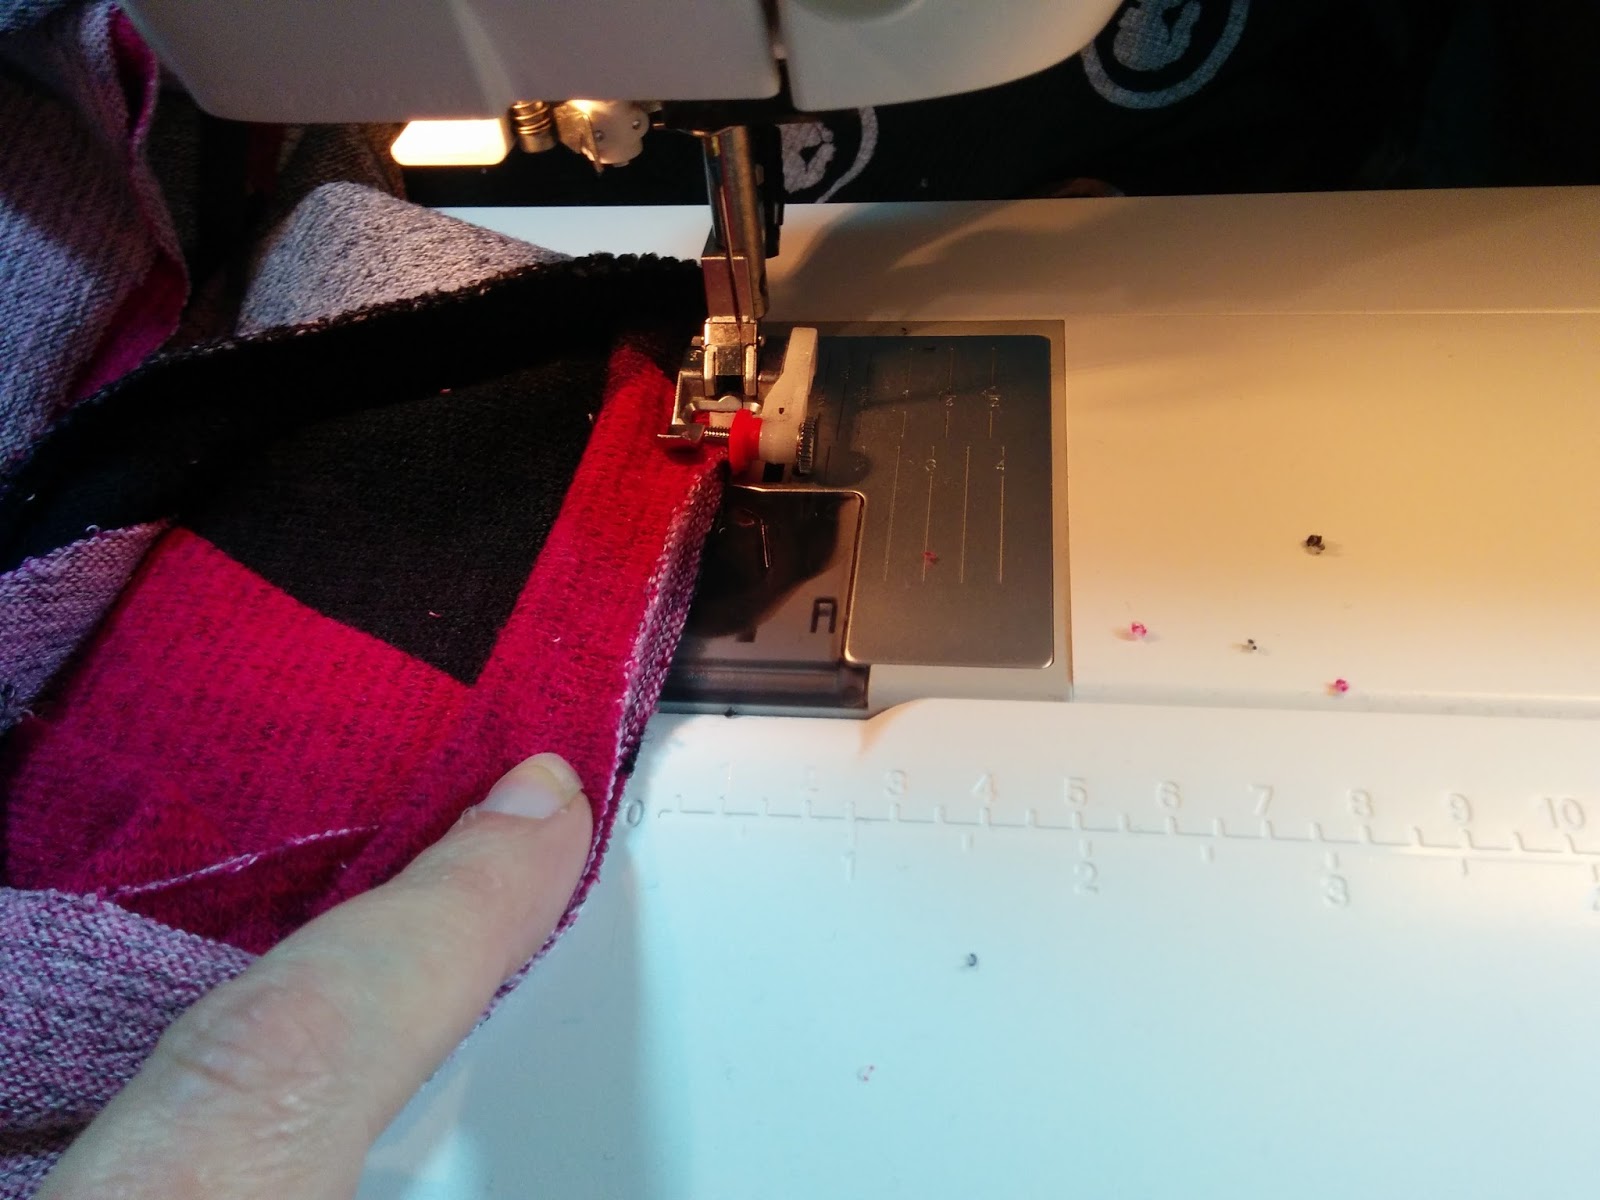
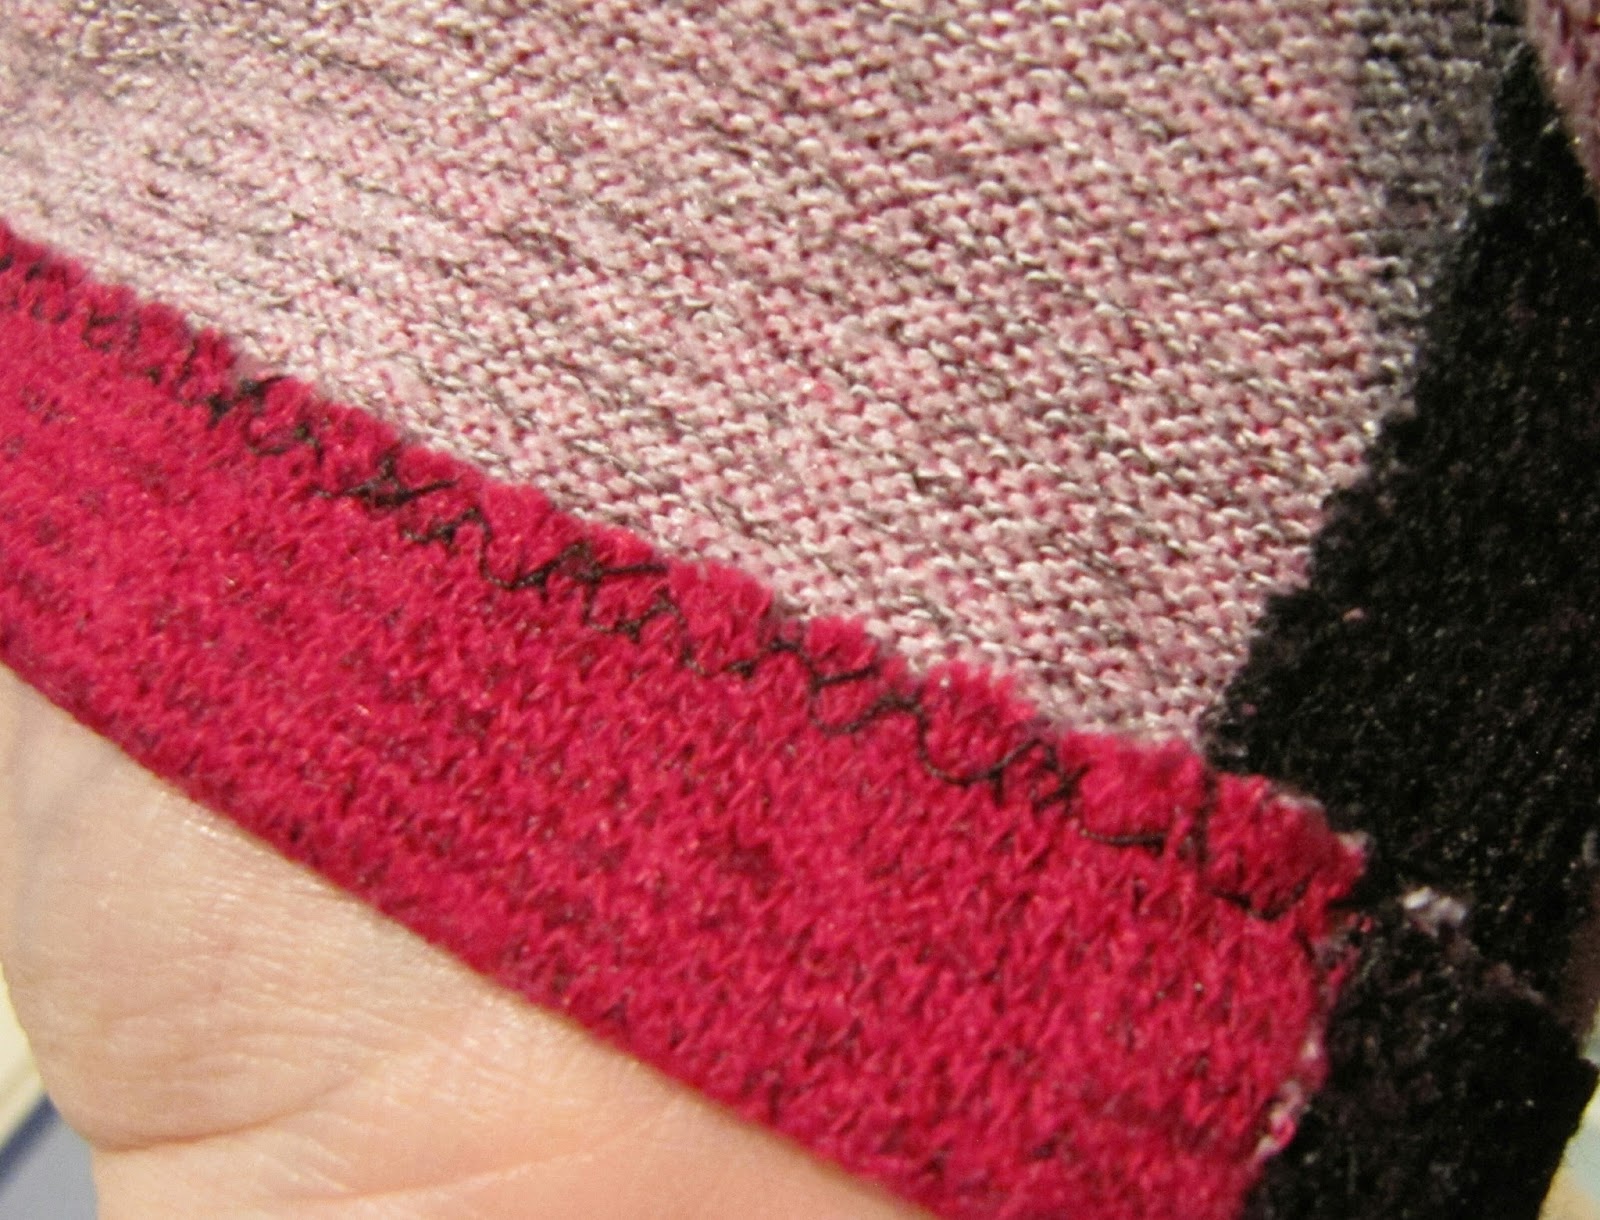
Also, the instructions say to put the Rouleau loops in the side seams so the ends are encased in the seam for the belt loops.  However, I was extra frustrated by my fabric fraying and I stupidly started a couple of my french seams the wrong way round, which exacerbated the problem.  So, in all my frustration, I was a bad tester and I forgot to actually check back to the instructions and I missed attaching the belt loops and the hanging loop at the time I was supposed to.  I just left the hanging loop off, but for the side loops, I just attached them flat with the ends folded under.  I might actually prefer it this way, but for my next version I’ll try the right way so I can compare.

Even though I didn’t like the fabric much at first and I had problems due to my fabric choice that made this a frustrating sew, the finished kimono more than makes up for it all my issues.  I LOVE this robe!  It’s very warm in Seattle this summer and this is 100% polyester, so I’m not wearing it right now.  But once it cools off, I’ll be living in this thing.  I definitely plan on making more and I already have plans for a summer friendly version and a slightly hacked version that I hope will give off the essence of an old Hollywood dressing gown.

This is the tester version, but the only real difference between what I made and the final release is fixing some minor mistakes to a couple pattern pieces to make construction easier.

I definitely feel very glamorous with this kimono on.  Since I’ve been working at home for the past 2 months, I find that I usually don’t bother getting dressed.  So this kimono just goes on over my lounging clothes for when I need to answer the door for a package or step outside for some reason or another.  And the sleeve length is perfect for not getting in the way of daily activities, like sitting out on the back deck drinking coffee.

If you haven’t seen them yet, you really should check out the rest of the versions from the tester roundup on the Helen’s Closet blog.  And today (August 1, 2017) is the last day the Suki Kimono is on sale for 20% off!  So get it now!  And while you’re there, pick up her other two patterns too, which are both equally as wonderful.

Pride dress 2017 edition

This is my (hopefully) first entry for the Hack It! contest over at The Monthly Stitch.

So, the rainbow dress I made for Pride in 2015 is a little too baggy on me now, so I decided that I needed a new one.  Instead of just repeating what I did before, I decided to try something different.

I sketched out what I was hoping to achieve.

I decided to use the Seamwork Mesa for my starting pattern.  I’ve made it twice before and I knew it fit pretty well.  I did go down a size from my previous ones and I think it’s even a better fit now.  I compared the front and the back of the dress pattern and decided that they were close enough in size/shape that I’d be ok just making two fronts and sewing them together, which made this hack much easier.  So first I printed out the dress front piece twice and taped them together to make a full piece.

You can see above that I sketched in the lines for the rainbow pieces.  I did a combination of eyeballing and measuring to get them to roughly appear even.  I then colored in the stripes to help keep which piece goes with which color fabric once I started cutting out the pieces.

I then cut each piece apart and added seam allowances.  I even added actual notches like a good seamstress!  As you may have noticed in the photo above, I messed up my rainbow coloring.  Luckily, I figured it out while I was still adding the seam allowances and fixed the colors with some permanent markers over my colored pencil.

The fabrics I used all happen to be in my ginormous stash.  I have a bunch of nylon/lycra active wear fabrics that I pick up on sale from Fabric Mart and Fashion Fabrics Club whenever I can so that I am able to make a ballroom gown on a moment’s notice, if I were to so choose to do so.

Since I made the decision to just make two front pieces and sew them together, I was able to just cut a double layer of each color.

I then just sewed each half of the main dress together and cut one red and one yellow sleeve and sewed it all together.  I would have liked to split the sleeve into yellow and green like in my sketch, but I was doing this the day before I needed to wear the dress, so I got a little lazy.

And the back is just a mirrored image of the front.
And here we are on the Link light rail, heading down to Seattle Pride.

I didn’t take all that many photos of the actual parade, but I did get particularly misty eyed when I saw Wizards of the Coast walking, so I had to grab a photo.  I had just left a couple weeks before and had been in a lot of the planning meetings for their first ever appearance in the parade.  I’m so proud to have been a part of that company.

After the parade, we had dinner downtown with the kids and then the hubby and I went to see Romy and Michele the Musical.  He managed to get a couple not terrible shots of me on the streets of Seattle.

You can see a little of the stripe matching on the side.

In front of the show poster that is cut off and obscured.  haha.

I’m quite proud of this dress and I’ll be happy to wear it again next year and I might even decide to just wear it around because it’s a pretty awesome dress.  I also plan on reusing the pattern for a striped version, possibly in Seahawks colors.

A lovely Butterick 5243

I cut this lovely dress out over a year ago, and I had finally started sewing it in August, but I had to put it on hold because I was missing a couple pieces and then I was chosen to participate in the Fabricista Fashion Challenge 4.  This is as far as I got before I put it on the back burner.

The pattern is (OOP) Butterick 5243 and I picked view A with the lovely flutter sleeves.

The fabric is a Mustard/Brown/Teal/Multi Abstract Floral Jersey Knit that I bought from Fabric Mart in May of 2015.  The back of the fabric is soft and flannel like and I just love the way it feels, as well as how it looks.

We went to the Fremont Troll to take these photos because I thought it would be fun to start adding a little bit more of the Seattle experience to my blog.   Plus, we were headed to Fremont to go to our favorite conveyor belt sushi place for lunch anyway, so it was only a couple blocks out of our way.  Well, I forgot how popular the Troll is, so we took most of our photos in the area next to the troll since it was people free and there was a lovely green background.  We got some with the Troll in the background too, but it was near impossible to not have other people in the photos, so not many of those came out very well.  Oh well, interesting idea, but it didn’t pan out like I’d hoped.
The photo above led to my favorite photo.  My daughter was my photographer and I was playing up the pinup girl feeling I have wearing this dress by lifting my skirt to show a little more leg and my daughter said “Oh, those gams!” and that made me laugh, which she captured so well.

I didn’t make any alterations to the pattern, but I made one small change to the construction process.  When I went to add the waistband to the bodice, the front cross over was still all open.  So, instead of properly matching the notches to make the crossover, I wanted to make sure the bodice wasn’t dangerously low and I could wear it without worry.  So, I tried it on and got the crossover the way I wanted it and basted that together.  Then, as I was attaching the waistband, I just gathered it at the underbust to make it fit.  So, I think I don’t have quite as much gathered as the example photos because my front pieces overlap more than they are supposed to, but it fits perfect right now and shows just the right amount of cleavage.

I also hand sewed the neckline facing to the seam allowance of the yoke.  I used to hate hand sewing, but I totally didn’t mind doing it the last couple times and I think it made the neckline turn out much nicer than if I’d tried to sew it down by machine.
Overall, I really am very pleased with how this dress turned out.  I do wish I’d gone with the long sleeve version, simply because both times I wore it, I was chilly and ended up wearing a jacket over it, so a lot of the nice details were hidden.

My daughter liked this photo because she said I was making the same face as the Troll.  It was not intentional on my part at all, but I can’t help but agree with her!

Fabricista Fashion Challenge #3 finished product!

The details of the 3rd challenge can be found here, along with the results of the second challenge (spoiler: I was safe.)  But basically we needed to pick something from our closet, home made or store bought, that doesn’t get much wear and create two items to go with the chosen item.
I was very excited about this challenge.  I had a couple options for my garment to use, but I chose a red and black plaid pencil skirt that I bought a couple years ago at a thrift shop and have never worn. 
I knew right away that I wanted to do one red top and one black top to go with it.  My original plan for the red was a red lace top and a matching red tank to wear under it.  And I wanted the black top to be something a bit more structured with a fit and flare shape to it.  With that in mind, I drew up these sketches.  The body proportions in my sketches are still fairly off, but I am choosing to do full sketches instead of using croquis because I am actively trying to improve my skills.
For the red, I was planning on using two fabrics in my stash that were both purchased from Fabric Mart and still had the stickers on them.
I made the red tank top using the Love Notions Luna Loungewear pattern.  I don’t typically do a real FBA on knit paterns, so I simply used the XXXL at the bust and blended down to the XL at the waist and hips.  It came together very nicely and pretty quickly and I love the fit.  I wear a lot of tanks around the house and under clothes, so this pattern is definitely a keeper.
For the lace top, I used the Seamwork Aberdeen, with the cut-on sleeves lengthened and then drafted my own bell cuff to the sleeve.  I don’t have any photos of it, but I hated the way it looked.  I had such high hopes for the look because of my sketch, but my execution just didn’t look good.  I loved the color of that tank top with the plaid skirt so I decided to scrap the lace and use the remaining yardage of the maroon knit for a Swoon Scarf neck cardigan.


I love, love, love this duo!  My daughter and I went down to the corner to the park for a photo shoot and I’m so pleased with how these photos turned out.
Technically, this is two items I made to go with my skirt, however, I will never wear either by itself, so I think of it as one as far as this challenge goes.
For the second item, I had a hard time finding a pattern that met the image I had in my head.  I considered drafting/draping something myself, but I have very little experience doing that and I was concerned that I wouldn’t have enough time to work everything out and still get something completed by the deadline.  So I chose to modify the Sew Over It Vintage Shirt Dress to be a peplum blouse.  I chose a black satin that is a little heavier because I thought it would lend a little extra structure to the top.
I had to do a 4″ FBA on the largest size, size 20.  Other than that, I used the bodice as is and cut the skirt 6″ long and shaped the front to be curved.  The back had two small pleats on the sides, but after we started trying to photograph this top, every little fold, pleat, ripple, etc. showed up magnified by 1000 and the back just looked extra messy in the photos, so I quickly re-did it to have a single pleat in the middle.
The after photo looks like there are folds radiating out from the pleat, but it really doesn’t look like that in person.  In fact, here’s a photo where I’m in the same pose and just had my hand on my hip and you can see how drastically different the back peplum looks.
  We were all amazed at how different this top looked in the photographs vs. how it looks in person.  If anyone has any tips on what we could have done differently, I’d LOVE to hear them.  Other than taking photos during the daylight, of course, which wasn’t an option this time.
We took dozens and dozens of photos in various spots inside my house and even went outside to try by streetlight.  The street light photos turned out fairly interesting, but unfortunately it was still hard to see the top very well.  And I have some nice, glowing eyes that I don’t know how to fix.  I guess I should really work on my photo editing skills!
I have some seriously stiff competition this week, so I’d really appreciate any and all votes so I can make it to the final round next week!  Go to this post on the Fabric Mart blog to see all the entries and use the “VOTE NOW!!” link at the bottom of the post, right above the comments, to choose your favorite.

Fabricista Fashion Challenge #2 finished product!

When I read this week’s challenge, I had mixed emotions.  I was scared and worried because making a trench coat seemed like a massive amount of work in a very short amount of time.  But I was also excited because at the beginning of the year I set a goal to make outerwear before the year was over, and this was going to force me into actually accomplishing that goal.  And I had already identified a trench coat from the 2/2014 issue of Ottobre Design magazine as one of my options.  So it was destined to be this coat.
I looked through my stash and I have several fabrics that would work well as a trench coat — even a couple water resistant fabrics that would work well with living in Seattle.  But none of them seemed to fit the bill of expressing my personality.  So, I decided to take a quick trip over to Ikea on my lunch break last week (note to self, a trip to Ikea is NEVER quick!) because when my daughter and I were there a few weeks ago I remembered seeing a couple fabrics that I really liked, but didn’t have any use in mind, so I didn’t buy anything.  I picked up 4 yards of this colorful, very busy, heavy 100% cotton floral fabric.
I thought this fabric expressed my personality because it was fun and colorful and a little loud.  I work in tech and I am an introvert, but once I get to feel comfortable with people, I tend to talk a lot and have been told I get loud.  I also really love experiencing life.  I’m not an adrenaline junkie or anything, but I do enjoy trying new things and putting myself out there as much as possible because life is all about making great memories and never having regrets. 
I had in my stash a lovely blue sateen fabric that I thought looked great with this print and helped tame the busy-ness of the print a bit and keeps in it check, so I used that for some contrast flat piping in the seams and as the collar and belt. 
I also had a yellow satin in my stash that I used as the lining and a package of red piping that I picked up from an awesome store near my house called Seattle ReCreative, which is one of the best places to find really cool notions and fabrics.

I really like how the pockets turned out.  I didn’t get a photo, but the pocket piece is lined with the same yellow satin that makes up the coat lining and I love how it feels on my hand when I put it in my pocket.

Here are a couple photos on my dress form, the photo of the back was taken before I finished the hem — I apparently didn’t take any after of the back..
I used a red piping between the facings and the lining.  I really like that little hidden detail.
Some detailed shots of the flat piping on the outside.
Getting the sleeve seams to match up perfectly took a few tries and it’s a bit lost in the shuffle, but it makes me very happy.
I’m a walking zombie from the lack of sleep I’ve had the last several days trying to get this sewn up.  But this coat was a lot of firsts for me (including my very first collar!), and Ottobre magazine isn’t exactly known for their detailed instructions, so my seam ripper was my best friend on this project and I had to try some things several times before I got them right.


The finished projects are all up on the Fabric Mart blog, so go check them out and vote for your favorite.  All of the other ladies made absolutely gorgeous coats with great details and workmanship.  I’m very, very impressed with all of them because I ended up having to leave out a lot of the details I had hoped to add, like the epaulettes and the cuff straps, although I have those pieces cut and I hope to get them on when I get some time to revisit my coat.  I also didn’t add buttons because I had planned to make frog closures out of the blue fabric, and I probably still will.  But I was pleasantly surprised at how well it worked just using the belt as a closure.

Fabricista Fashion Challenge week 1 results

Well, I’m a bit late getting this posted, but on Friday the results of the first challenge in the Fabricista Fashion Challenge 4 was posted.  I co-won with the very talented Tee from Maggie Elaine.  Unfortunately Brittany from Brittany J. Jones was eliminated.

I would like to say thank you to everyone who voted for me and for all the really sweet comments you all made about my dress.  It’s definitely one of the things I’m most proud of having made.

There were also three winners of the reader participation prize, which was a 3 yard cut of that same lovely sweater knit we used for our first projects.  Contratulations to SewMeAdorable, Lilmrs_winslay and Virginiasdaughter on Instagram! I’m following you all on Instagram now and I’m looking forward to seeing what you make with it!

The second week’s challenge is to make a trench coat.  I was completely freaking out and I had several all nighters, but I got it done enough to call it complete and I submitted my writeup and photos just a little bit ago.  I love my new trench coat, but I do have a few more details I plan on getting into it before I start actually wearing it.

The projects will be posted on the Fabric Mart blog tomorrow, but until then, I’ll leave you with a little sneak peek.

Fabricista Fashion Challenge #1 finished product!

I made a dress!!  Is anyone really surprised?  But this isn’t just any dress, it’s a gorgeous carefully pieced work of art (if I do say so myself.)  It is absolutely my favorite thing I’ve ever made so far.

When the fabric arrived, I was very pleased with the quality and the colors are just so pretty and perfect for fall.  But the more I contemplated and sketched ideas, I kept finding my sketches pulling in the colors, but since I was usually away from the fabric when I was sketching, I just kept forgetting that the scale of the pattern was very large, as you can see in this photo of it draped over my dress form.


Although I liked what I sketched (badly,) they didn’t accurately reflect what the garment would look like in the actual fabric.  I just couldn’t wrap my head around how to use it in a way that I’d be able to either pattern match across seams or make it very apparent that I didn’t intend to pattern match (by rotating the fabric, for example.)  I also didn’t like the idea of the mustard or the hot pink colors being close to my face.  I don’t find those colors very flattering on me, so I was hoping to be able to place them far from where they can clash with my skin tone.  

So, I sat and looked at the fabric laying out on my cutting table, sketchbook in hand and I remembered a technique I had seen not too long ago in a sewing magazine that I had been wanting to try.  Unfortunately, I can’t remember which magazine and even leafed through a few to see if I could find the article I was thinking about, with no luck.  But the technique was to take a fabric with a large pattern repeat and cut out a particular portion of the repeat several times and sew them back together to make a new design.

So, I decided to use my TNT Kitschy Coo Lady Skater pattern and divide each bodice and skirt piece vertically into 2 pieces, adding seam allowances between them, thus making 4 panels across the width of the dress.  I identified where on the fabric I would lay out each piece and sketched out the design, trying to keep the scale as accurate as possible, to see how I’d like it.  I loved it, so I settled on that as a plan, even before I finished coloring it in.  My colored pencils just don’t do the colors in this fabric justice!

As shown in the photo above of my previously altered Lady Skater front bodice piece, I drew a vertical line from the bottom, halfway between the side seam stitching line and center front fold line (since seam allowances hadn’t been added yet) up to where I thought it would look aesthetically pleasing and did the same for the bodice back.  For the skirt I did the same, but I marked exactly halfway between the stitching lines at both the top and the bottom of the pattern.  I then copied each of the pattern halves onto tissue paper and added seam allowances at the fold lines and to both halves where the original patterns were split in the middle.


I started with the bodice and cut out one of the center front panels first.  Then used it as a guide to determine where to lay the side bodice piece that was going to be next to it, matching the seam line on one side.  Since the top of the bodice pieces were very different shapes, I focused on making the fabric pattern at the waist seam consistent to get the effect I was after.

My original sketch planned to use another sweater knit I have in my stash that is solid black for the sleeves, but after I pulled it out and looked at it, it didn’t have the same sheen as the provided fabric and it just looked dull and lifeless next to this gorgeous knit.  I considered leaving the dress sleeveless, but ultimately I want to have a dress that I will actually wear, so I decided to use the leftover fabric, which I barely had two pieces just big enough to cut the pattern’s cap sleeves.  I just positioned the sleeve piece such that the front of both sleeves had as much of the black as possible, to try to keep as close to my original vision as possible.

I also had planned on using that other sweater knit for the neck band, but that was out now.  I didn’t want to just turn and stitch the neckline, so I made the decision to fully line the dress with a black cotton thermal knit with cameos printed on it that I picked a long time ago for very cheap and have thought I might never use.  It had almost the exact stretch amount and was just a tad lighter than the sweater knit, so it seemed the perfect pairing.  I used the unmodified pattern for the lining pieces and attached them to the shell at the neck, armscyes and the waist, letting the skirt lining basically hang free and just using french tacks to keep it in place.

My tips for working with sweater knits.

First of all, there are many different types of sweater knits.  This one was what I’d consider a pretty stable sweater knit.  The weave is tight and the fabric is opaque, but I’ve worked with very loose weave sweater knits before.  I think Seamwork’s guide to sewing with sweater knits is a good starting point.

In addition to the tips Seamwork provide, these are the things I have found helpful when I work with sweater knits.

1.    Keep a lint brush handy!  Or what I refer to as a “rolly sticky.”  When you cut into these fabrics, a million little loops get opened up, so there is lint EVERYWHERE.  Not just on the cutting table, but they’ll be all over your machine and workspace and the garment and my dress form was covered in tiny pieces of sweater knit. 

2.    When cutting, mark your notches with pins or thread or do like I was taught growing up and cut them outward, not inward to avoid losing them in the weave of the sweater knit.

3.    BASTE, BASTE, BASTE!  This is always a good idea anyway, but even with TNT patterns, it’s just smart to baste your seams first with sweater knits. Because sweater knits tend to be lofty, the stitches have this great way of just sinking in and disappearing, which is fantastic, but it also makes it so that the stitches are nearly impossible to see to rip out.  Luckily I didn’t have any mistakes this time around and I only know how hard the stitches are to rip out because after the dress was assembled, I thought maybe I would add a pocket.  After about half an hour and only having about an inch ripped out, I decided it was way too much work and just resewed that bit shut again.  But I definitely basted almost all of my seams first, especially that waist seam, since I wanted the vertical seams to match up perfectly.  Below is a photo of how the seams just disappear.  That is actually a seam right down the middle of the photo.

I tend to be a fairly lazy sewist most of the time since I’m just making clothes for myself, but seeing how great this dress turned out actually made me take the extra time to hand sew an invisible hem.  I overlocked the raw edge, pressed it up 5/8” and catch stitched it.  The fabric is nice and lofty, so I was able to catch a few threads of the body without anything even showing on the right side.

Overall, this fabric was a dream to work with.  It pressed really well, the seams absolutely disappear into it and it’s just gorgeous.  I got to use a technique I’ve been wanting to use for a while and it made an amazing dress that I’m incredibly proud of and have been showing off to everyone who’ll pay attention to me.
All of the projects are up on the Fabric Mart blog and I definitely have some stiff competition.  So go check out all the entries and vote for the project you liked the best.

Fabricista Fashion Challenge #1 has been announced!

Full details of the challenge and the voting criteria can be found on the Fabric Mart blog post.  But here’s my quick and dirty summary:

Each of us was sent a 3 yard cut of a sweater knit and we’ve been asked to make any garment we want with it.  We also need to provide at least 3 tips for sewing with sweater knit in our write up.  

Here is the photo of the fabric as shown in the challenge anouncement.

But for some scale context, here is the fabric draped over my dress form.
The colors are lovely and a perfect fall palette.  But the scale of the print is what has been worrying me the most.  But I’ve been noodling and doodling about what I’m going to make since the fabric arrived and I have a plan of attack that I’m VERY excited about.  Of course, I’m not going to reveal anything just yet — you’ll just have to wait to see what I come up with when all the entries are posted on Wednesday, Sept. 14 and available for you to vote for your favorite!

But, in the mean time, don’t forget that you can participate too!!  As stated in the challenge announcement

Reader Participation: 

This week’s challenge is a tough one for you to sew along with since you do not have the fabric. But we aren’t going to leave you in the dust! Your challenge is to make a garment from any sweater knit. Post a photo on Facebook or Instagram using #FabricistaFabricMart and 3 winners will be picked at random to receive their very own 3 yard piece of the gorgeous sweater knit the contestants used in the challenge.

I’m looking forward to seeing what the other ladies in the competition do with this fabric and I’m also very interested in what projects all the readers will post with their sweater knits!
Check back on Wednesday and I’ll post all the details of my project and maybe even some of the sketches of my rejected ideas just for funsies.

I’ve been chosen!

I have some exciting news.  I’ve been chosen as a contestant in the Fabric Mart Fabricista Fashion Challenge!  I will be competing against 5 other talented seamstresses in an elimination style competition, a la Project Runway.  Except we’ll get a week to complete our creations instead of the 1 or 2 days the PR designers get per challenge.  So that means I’m going to have to make it work!

The first challenge will be announced a week from today on Friday, Sept. 9.  You can follow along with us each week and even participate for prizes.  All the details of the contest and how you can participate can be found in the challenge announcement blog post.

I’m looking forward to this challenge and, I’m not going to lie, I’m pretty nervous about it too.  But it’ll be really good to get pushed out of my comfort zone.

Stay tuned!

Rose Red Lady Skater


May is inspiration month at The Monthly Stitch.  I have noticed that I have many dresses made out of fabric with lovely prints.  So, the easiest way for me to put together an outfit is to make leggings and/or cardigans in solid colors, neither of which I’ve successfully made yet (perhaps foreshadowing IPM…?)

So, as I was looking through TMS archives to find an inspirational post, this one for  Rosemary’s Fabulously Red Lady Skater caught my eye.  It’s a solid color, it’s my favorite dress pattern, it’s red, which I’ve traditionally avoided wearing, but lately have been told I should wear it more often.  So that seemed like a perfect dress to copy.  Especially since I even already had fabric on hand.


I had recently picked up some Rose Red Poly/Lycra Abstract Jacquard Double Knit from Fabric Mart with the intention of making myself a red dress.


And here’s a photo I took of it to show off the texture.


I’ve made the Kitschy Coo Lady Skater several times, but I tried something a bit different with this one.  The fabric is a bit scratchy, so I decided to line it with something that would feel better against my skin.  So I chose a very soft black and red animal print rayon blend jersey that I picked up from a flawed fabric bargain lot from Girl Charlee.  At first I only planned to line the bodice, but as I was constructing it, I thought about how the waist seam would end up being itchy and the dress being on my legs sitting at my desk all day might bug me too, so I cut the skirt pieces too.

I sandwiched the pieces together at the waist seam, as I did with the plaid version I made at the end of last year.  I didn’t line the sleeves, but my insides were looking so good that I thought maybe I would try a French seam to attach the sleeve.  This red fabric is pretty thick, so both of those plans were just terrible ideas.  Granted, I didn’t clip the curve of the sleeve seam, but still, the thickness of the French seam made the shoulder look bumpy and very bad.  Luckily, I only did one before I realized it was a mistake.  As for the waist seam, I just felt like the seam was too visibly bulky with all 4 fabrics joined together like that, and all 4 steam allowances all bunched up together.  So I started ripping out seams.  Which added a week to this project.  Mostly because I pouted some for a while at the fact that I had to do so much seam ripping and also because the lighting in my comfy spots are terrible for being able to rip out stitching that so closely matches the thread to the fabric.  But I did find some daylight times to be able to do it eventually.

Once I reassembled the dress with the lining hanging completely separate, the dress looked so much better constructed than it did previously.  And I just love how it looks on the hanger with the black and red animal print peeking out.

Here’s the finished dress inside out on my dress form.


I even added French tacks to keep the lining from shifting around too much.  I followed this tutorial from Ohhh Lulu.


And here I am wearing it out in the driveway.

My husband and I walked down to the park at the end of the street to take these photos.  Not many turned out very great.  Here’s me doing my best Vanna White impression.


And this one was me trying to act shocked in response to my husband making some crack about how he’s stalking me in the woods.  My new glasses have transition lenses, so I don’t really notice them changing and am always surprised to see I’m wearing sunglasses in my photos.  haha.


« Older posts

© 2026 Clothing Hacker

Theme by Anders NorenUp ↑