Full details of the challenge and the voting criteria can be found on the Fabric Mart blog post. But here’s my quick and dirty summary:
Each of us was sent a 3 yard cut of a sweater knit and we’ve been asked to make any garment we want with it. We also need to provide at least 3 tips for sewing with sweater knit in our write up.
Here is the photo of the fabric as shown in the challenge anouncement.
But for some scale context, here is the fabric draped over my dress form.
The colors are lovely and a perfect fall palette. But the scale of the print is what has been worrying me the most. But I’ve been noodling and doodling about what I’m going to make since the fabric arrived and I have a plan of attack that I’m VERY excited about. Of course, I’m not going to reveal anything just yet — you’ll just have to wait to see what I come up with when all the entries are posted on Wednesday, Sept. 14 and available for you to vote for your favorite!
But, in the mean time, don’t forget that you can participate too!! As stated in the challenge announcement:
Reader Participation:
This week’s challenge is a tough one for you to sew along with since you do not have the fabric. But we aren’t going to leave you in the dust! Your challenge is to make a garment from any sweater knit. Post a photo on Facebook or Instagram using #FabricistaFabricMart and 3 winners will be picked at random to receive their very own 3 yard piece of the gorgeous sweater knit the contestants used in the challenge.
I’m looking forward to seeing what the other ladies in the competition do with this fabric and I’m also very interested in what projects all the readers will post with their sweater knits!
Check back on Wednesday and I’ll post all the details of my project and maybe even some of the sketches of my rejected ideas just for funsies.
I have some exciting news. I’ve been chosen as a contestant in the Fabric Mart Fabricista Fashion Challenge! I will be competing against 5 other talented seamstresses in an elimination style competition, a la Project Runway. Except we’ll get a week to complete our creations instead of the 1 or 2 days the PR designers get per challenge. So that means I’m going to have to make it work!
The first challenge will be announced a week from today on Friday, Sept. 9. You can follow along with us each week and even participate for prizes. All the details of the contest and how you can participate can be found in the challenge announcement blog post.
I’m looking forward to this challenge and, I’m not going to lie, I’m pretty nervous about it too. But it’ll be really good to get pushed out of my comfort zone.
I started making my first By Hand London Zeena that I got as part of The Monthly StitchChill Out Bundle with the intention of entering the Indie Pattern Month bundle contest. Unfortunately, my free time seemed to completely dry up just as I got everything cut out and ready to sew. After I did finally get it sewn up, I knew I wanted to make another, so I decided to just go ahead and make 3 and use that as my offering for the August challenge.
I made my first version from a fun floral 100% Rayon faille with the bodice lined with a bright yellow voile. My current measurements (49, 38, 48) put me in the size US 16 with a 4″ FBA. Well, I was a little confused how to do the FBA without a side dart, so I sorta did it the normal way, adding a side dart, then rotated it into the kimono sleeve a little and the bulk of it into the waist pleat. However, after I cut my fabric, I realized in all my research and confusion, I forgot to halve my adjustment amount and ended up adding 4″ to the pattern piece, which means I added 8″ total to the bodice front. Doh. And my method also didn’t add any length to the piece. So the waist seam is way too high in the front. But I ended up fiddling with the pleats quite a bit and moving where they are in the original pattern until I thought the dress didn’t look too bad.
I thought it would be a fun thing to try adding a waist stay. I read up quite a bit on how to do this and I decided to go with the method shown in this Sewaholic tutorial. This dress didn’t have a heavy skirt or a strapless bodice, so I mostly wanted it to take the strain off the zipper at the waistline and to make it a bit easier to zip up myself. But you can see from the pictures above that the front of the waist seam is much higher than the back.
I’ve worn this dress twice and got several compliments on it both times, so i guess I’m not the only one who thinks it doesn’t look too bad.
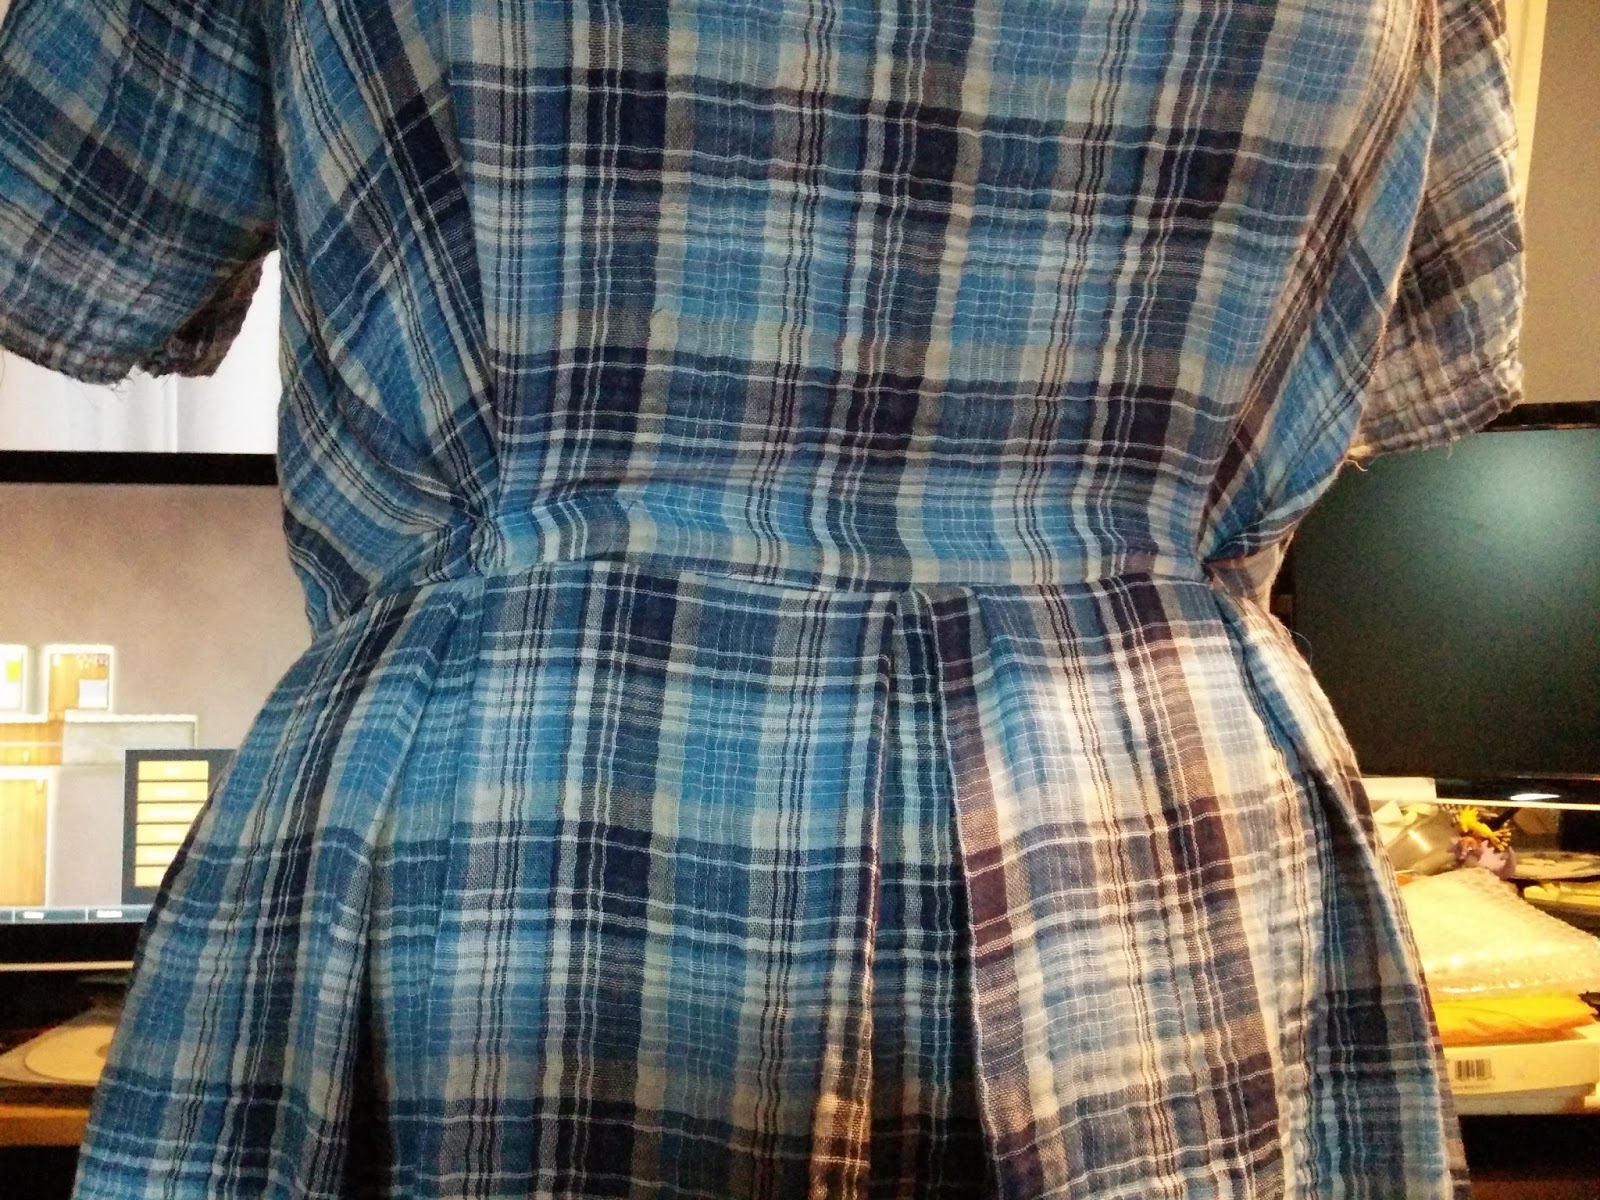
So, I fixed the FBA issue for my second version, which I made from a 100% cotton double gauze in blue plaid. But after wearing it to work yesterday, I think I need to take a little of the length of the front bodice back out. It’s not really very noticeable in these photos, but the waist seam stays pretty much right where it’s supposed to and the bodice poofs out a bit right above in a way I don’t like.
I cut the fabric trying to match the plaid at the center front, completely forgetting that the skirt has a pleat right in the front. However, when I first basted the bodice and skirt together, I was pleasantly surprised to see that the plaid was very close to matching up.
So I fiddled with the pleats a bit to just shift the fabric around within the existing pleats to make it match better.
So much better! I love how it turned out.
After my blue plaid Zeena was already mostly assembled, I noticed that when I wore my brown floral Zeena the zipper bulged out a bit at the lower back where it could use a sway back adjustment. So, I took a 1″ wedge out of the center back bodice for my third version, which I made out of a lovely ikat stripe print Rayon Challis (sold out) from Fabric Mart. And, of course none of the photos of the back of this dress turned out. But I do have dressform photos.
While cutting out this third Zeena, I had some issues because the fabric’s pattern repeat is pretty large, so I couldn’t cut the full midi length skirt (which is actually knee length on me.) And of course, I didn’t notice until I had already cut the skirt front and went to cut the back, matching the stripes.
I cut it as long as I could with the fabric I had, and it ended up about 3 1/2 inches shorter than the other two. But I think it was fortuitous since the shorter length paired with this fabric comes off nice and sassy, while the longer length makes the brown floral dress look classy and gives the plaid version a lovely 50s housewife feel that I am totally into.
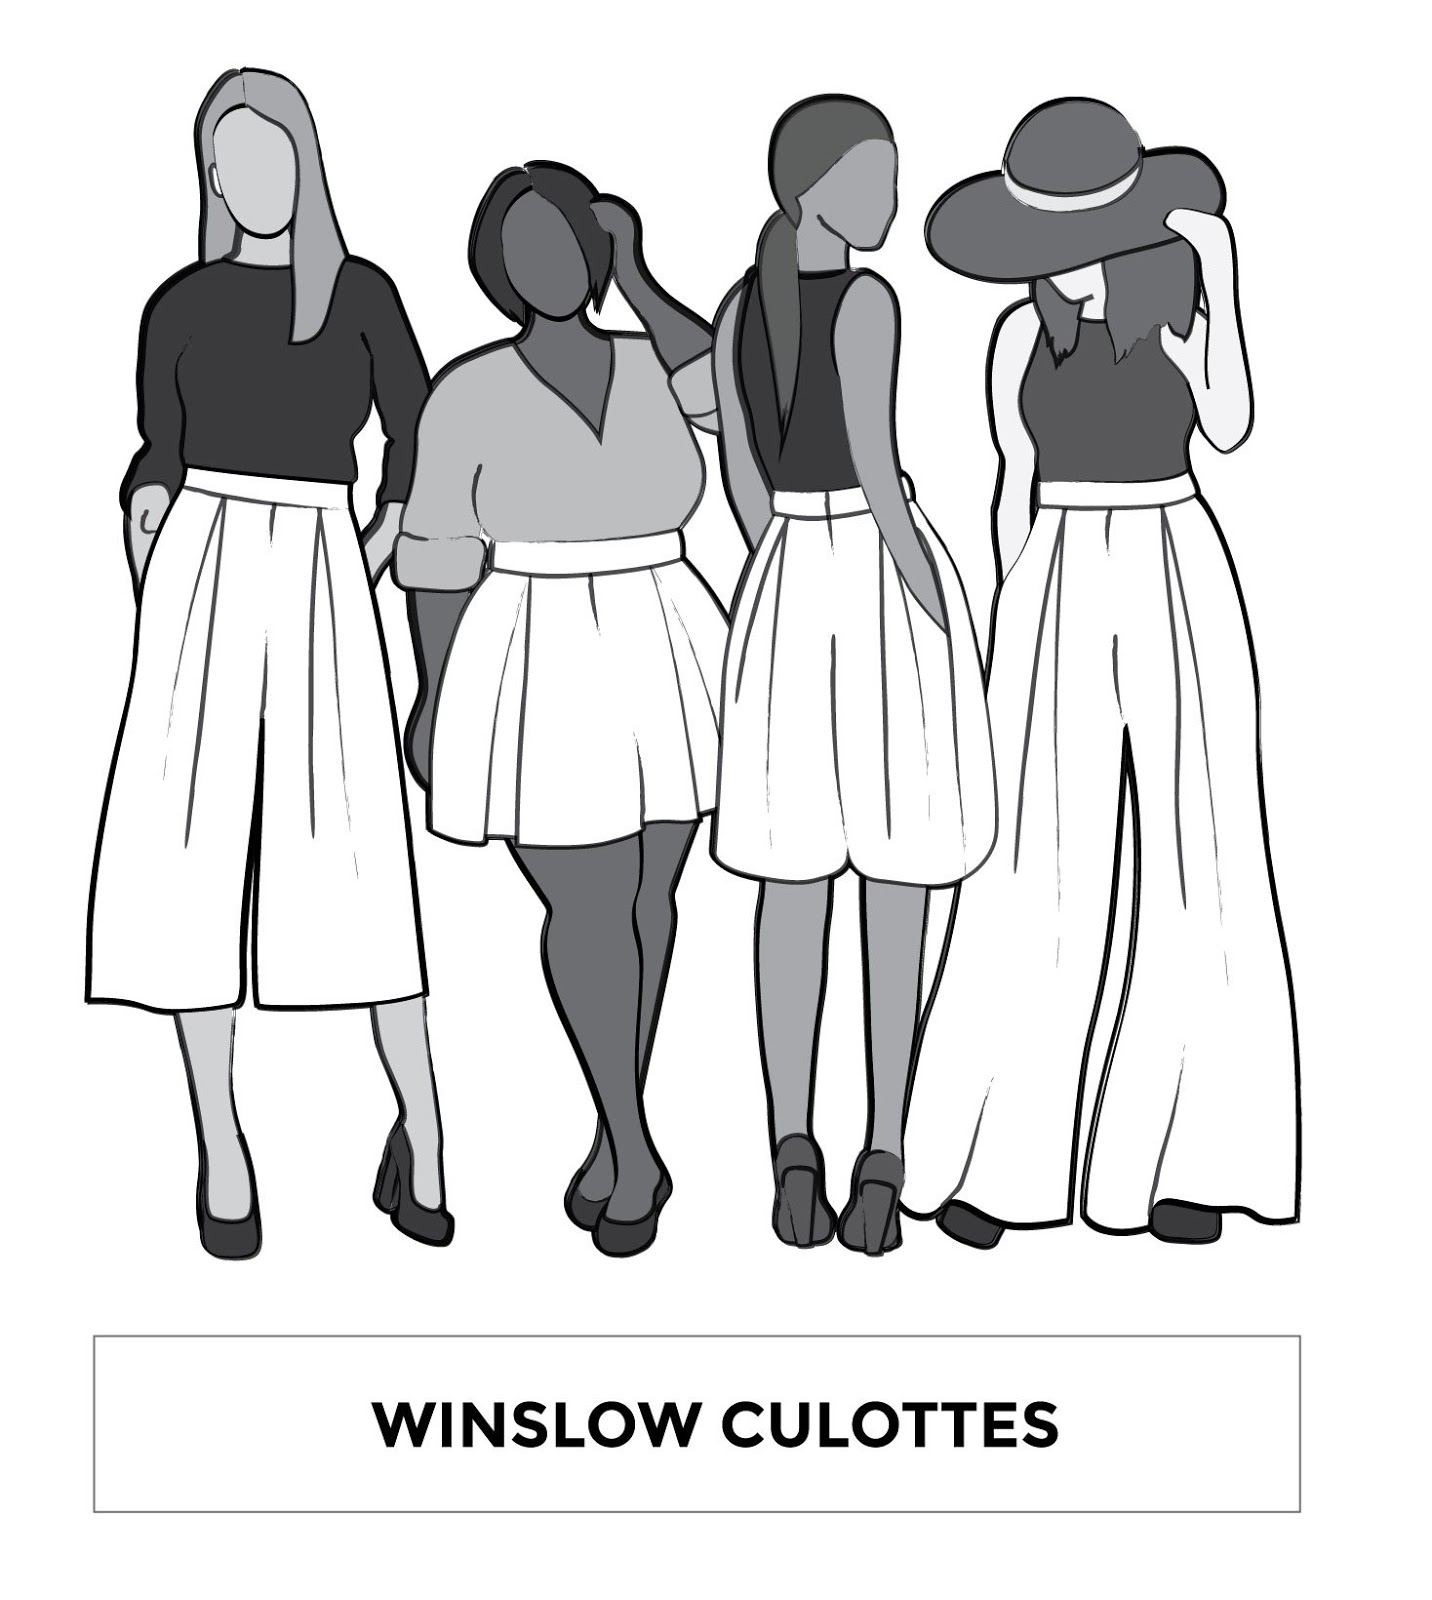
Just look how they appear to be a short and sassy skirt! But no, they are actually shorts! But, alas, the pattern doesn’t go up to my size and the amount of grading I’d have to do to get them to fit gives me a headache just thinking about it. And none of the other culottes patterns that I found held my interest nearly as much. Until Helen from Helen’s Closet put out a call for testers for the Winslow Culottes. Just look at this lovely illustration.
I applied immediately, hoping I would get chosen. And luckily enough I was!! In her initial email message to me, Helen mentioned that I was slightly outside of the size range but that she would be interested in seeing how they worked graded up.
For my first pair, I decided to use this triple georgette fabric that has been in my stash for quite a while.
This is a fabric that I was a little disappointed in once it arrived because I thought the color was going to be a little more toward sage green than the camel color it actually is. But it’ll work perfect for using for a wearable muslin — no real heartbreak if it doesn’t work out, but a very lovely pair of culottes if it does.
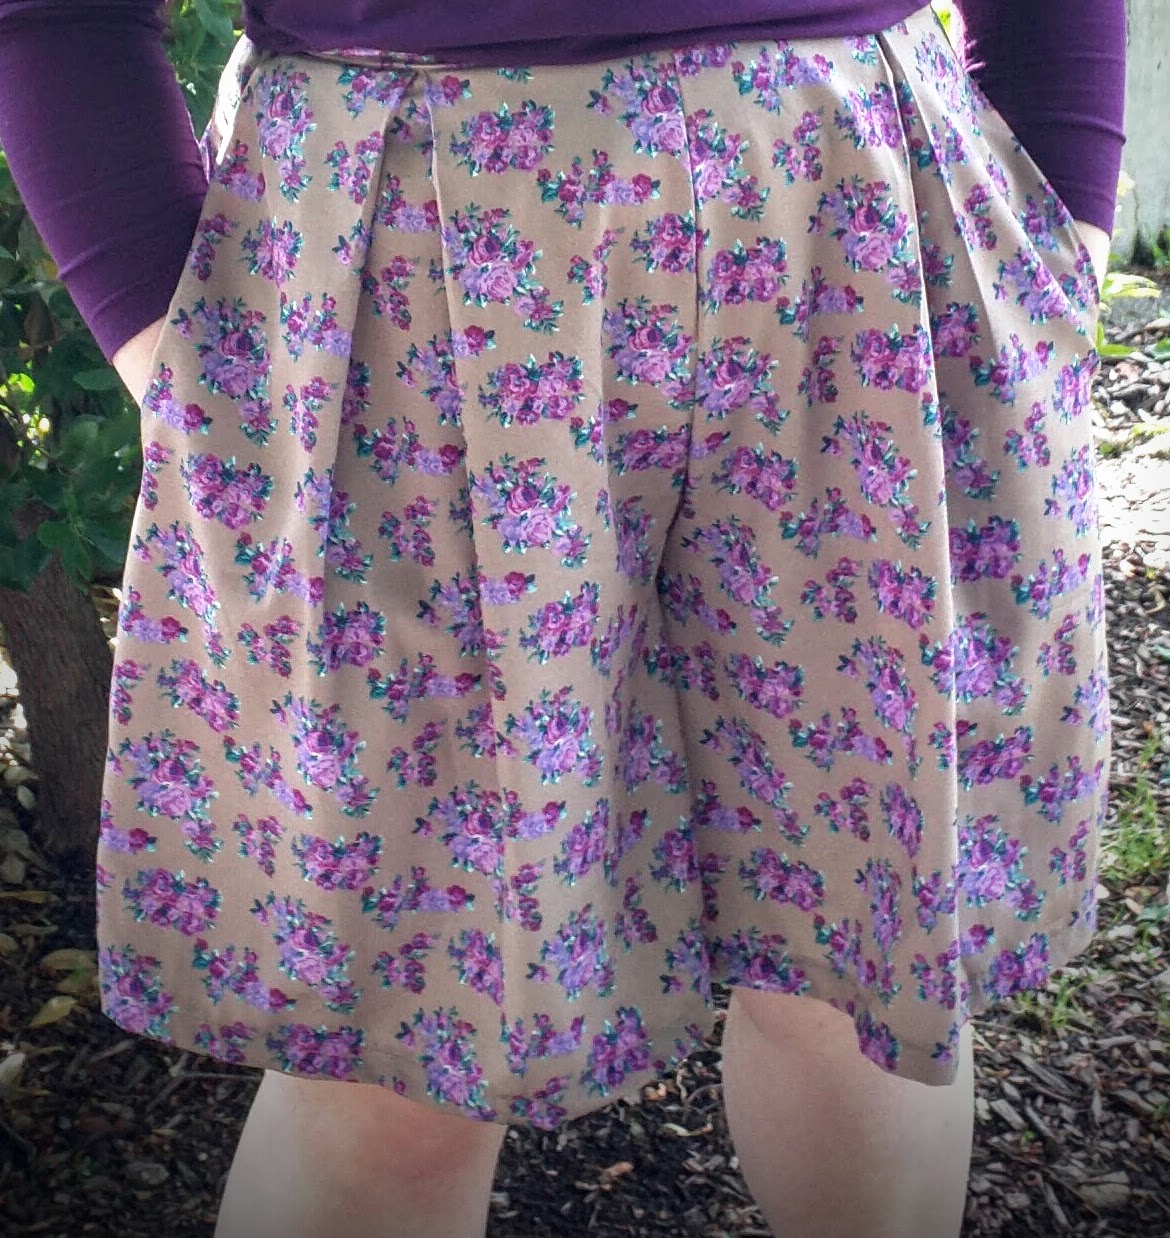
Once I sat there looking at the printed and taped pattern trying to decide whether to grade the pattern up or use as is, I decided to just cut a straight size 20, since my body size is reducing and I could squeeze all the “fluff” in my waist to make my measuring tape read 38″, which is the only measurement that really matters with these. I’m glad I did because by the time I finished sewing and took these photos, my measurements were actually right at the size 20. These are view B and the only pattern alteration I did to this pair was to lengthen them about 2″, since the pattern is drafted for someone 5’6″ and I’m 5’8″ with long legs.
When I first sewed them up, there was some pulling in the tummy/crotch area. I knew this wasn’t because of the pattern, though, because by the time I made mine, several other testers had already posted photos to our group and no one else had that problem. Turns out, my big tummy needs a special adjustment. I’m new to making separates, so I wasn’t already versed on what kinds of adjustments I need. To try to fix this pair, since they were already cut, I went back and reduced the crotch seam allowance as much as possible from right below the front waistband to an inch or so below the back zipper. This ended up adding about 1/2″ width right at the seam and made the crotch not pull quite as bad.
I’m fairly satisfied with this pair and my only complaints are about my fabric choice and the fact that I still don’t love the fit at the center front/crotch area.
For my second pair, I used an inexpensive (since this pair was still in muslin territory) navy linen/rayon blend from Morex Fabrics to make view A. I did a full tummy adjustment as shown in this tutorial from Colette. I also lengthened them a bit, but I free handed how much I lengthened them based on the way they were on my cutting mat, so I’m not sure how much I lengthened them. I’d guess about an inch and a half or so.
I love how these turned out and I’ve already worn them a couple of times. The full tummy adjustment did wonders for how they fall in the front.
They really do look like a cute little skirt and when I’ve worn them, people have been surprised to find out they are actually shorts.
I didn’t get any good photos of the back of the blue pair. This one was the best and I had to mess with the color and brightness quite a bit to make it not look just like a dark blue blob. I definitely need more experience in photo editing!
I love this pattern and I think view A is more my style, so I’ll probably make a few more pairs in the next couple months. And I already have some ideas about some hacks to try. But I know at some point I’m going to just have to make view D — the palazzo pants version.
Here’s a photo I took myself in the hallway outside of my sewing room right after I finished them. I like the way they look from the side — I think they actually make me look thinner here!
And finally, here’s a bad work bathroom selfie from the day I wore them to work. You can see how much this fabric wrinkles from sitting at my desk all day.
Helen just released the Winslow Culottes today and the pattern is 20% off for the next 7 days! The released pattern has very few changes from the tester version and the changes are just in the instructions and notch placements in the waistband. Go rush out and pick up this lovely pattern while it’s on sale!!
*Disclaimer: I received this pattern for free in return for testing the pattern and giving fit and construction feedback. All opinions are completely my own.
My current favorite dress is one that I made out of slightly flawed camo fabric that I got in a bargain bundle from Girl Charlee. I wanted to try out the Seamwork Perry, but I wanted to use my inexpensive fabric that I didn’t care about, in case it didn’t turn out. It turns out that this dress is just darling and I love the fabric choice!
I don’t think I ever would have paid full price for camouflage fabric, but I just love the way it looks as a dress. And I’ve gotten several compliments on it the few times I’ve worn it so far.
The fabric is fairly on the thin side, so I lined the bodice with the same burnout knit I used to line my velour Skater Anna, just to give it some extra coverage so my bra doesn’t show through.
I love the sleeve detail. At first, I thought I might have made a mistake cutting out the band because the it was way shorter than the end of the sleeve, but I just stretched that band extra hard as I sewed it on and now the sleeve has this lovely little poof at the end that I think is just cute as can be.
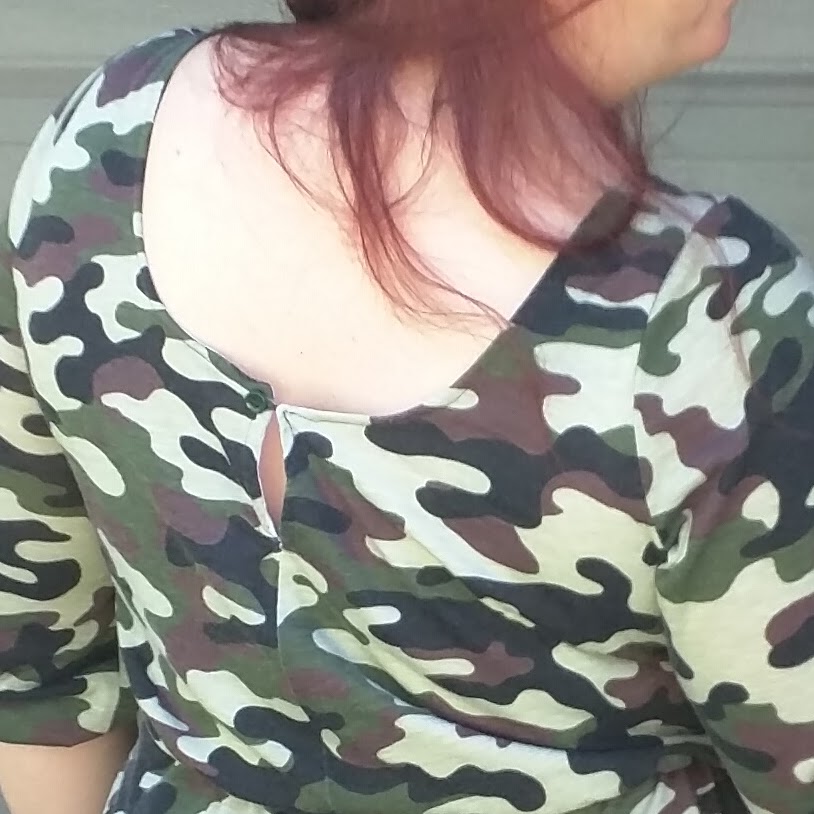
The back called for a hook and an eye to close the keyhole opening, but I thought it would be cute to use a button and a loop of elastic. As it turns out, the neckline is well big enough that I don’t ever have to undo the button, but it is functional just the same. I found a green button that matched perfectly in my stash and I used a bit of white elastic cord and used a black sharpie to make it match.
I then took the ends of the cut elastic cord and used my 3 step zigzag stitch and stitched them together side, but side, into a loop. Then I hand stitched that to the back opening, making sure to make the stitches on top of the (crooked) top stitching so they don’t show too much.
Here’s what it looks like closed up.
And here is how it actually looks on me.
The shoulders are cut a little narrow and the sleeve head comes way up onto my shoulder, so I widened the shoulders on my pattern a bit so that hopefully next time they will look a little better.
And here’s a photo of my Perry on my dress form.
This was a quick make, even though I didn’t quite take the 2 hours the pattern says it’ll take because I lined the bodice and fooled around adding the button and loop detail and also just because I’m a bit of a slow sewist. But I have already cut out my next one and plan to make a few more.
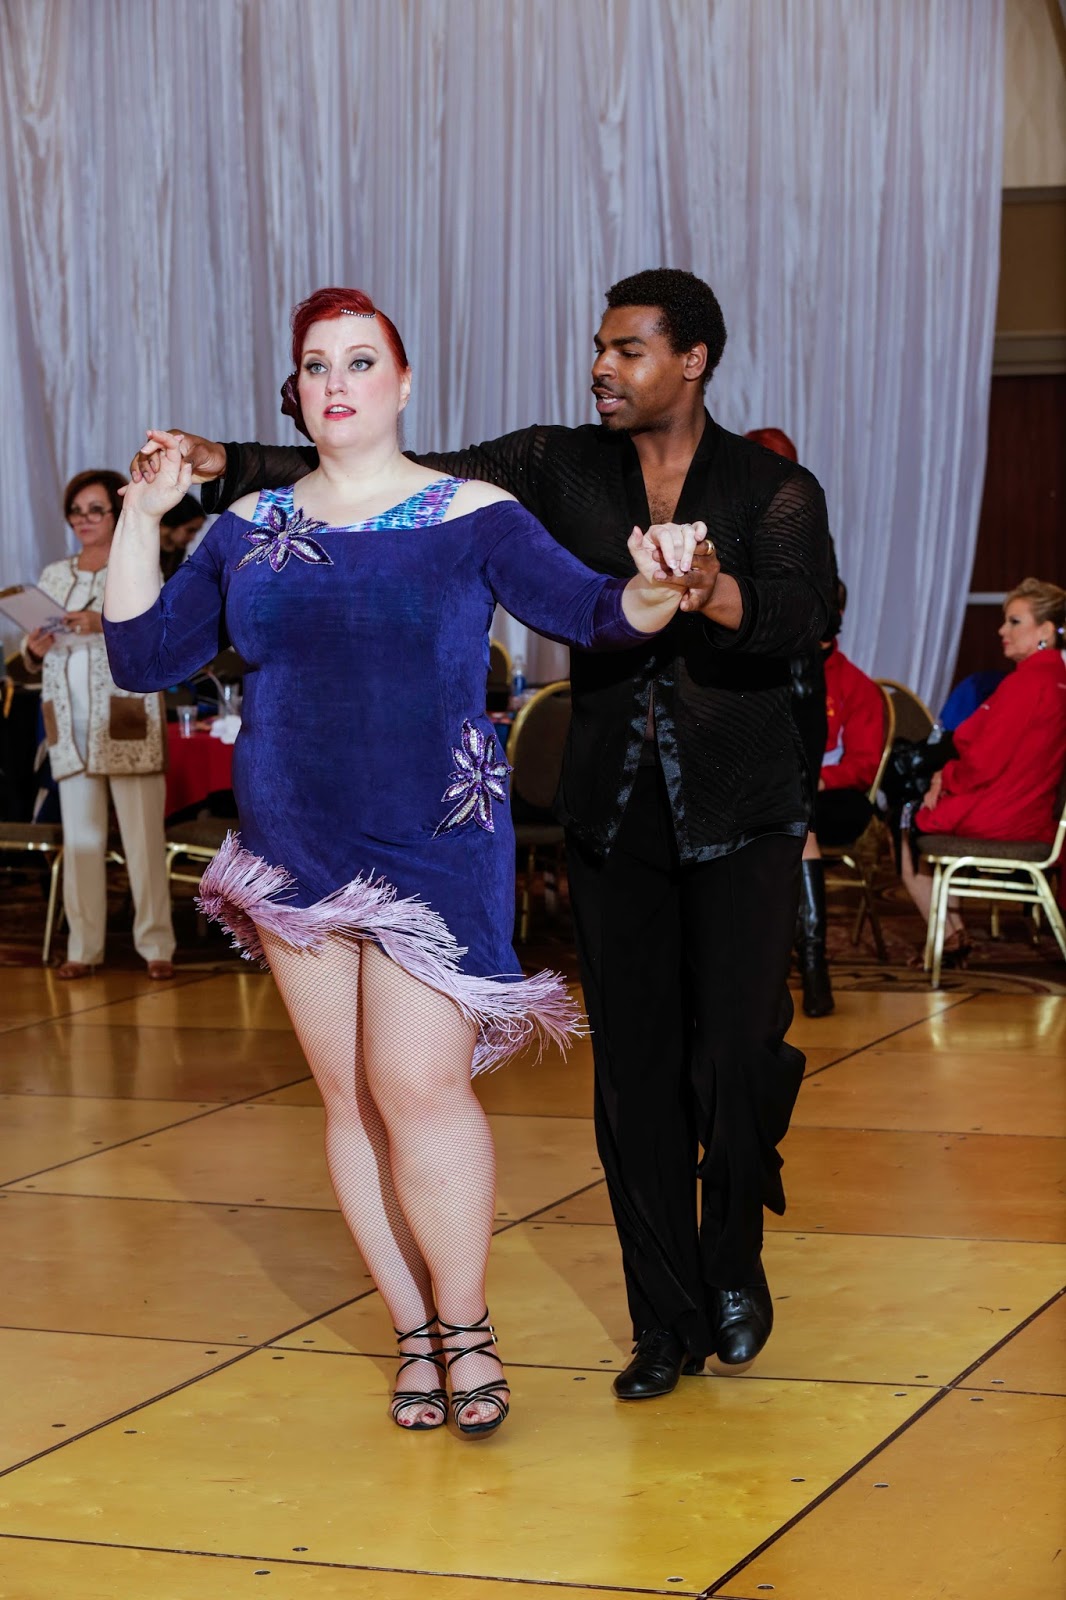
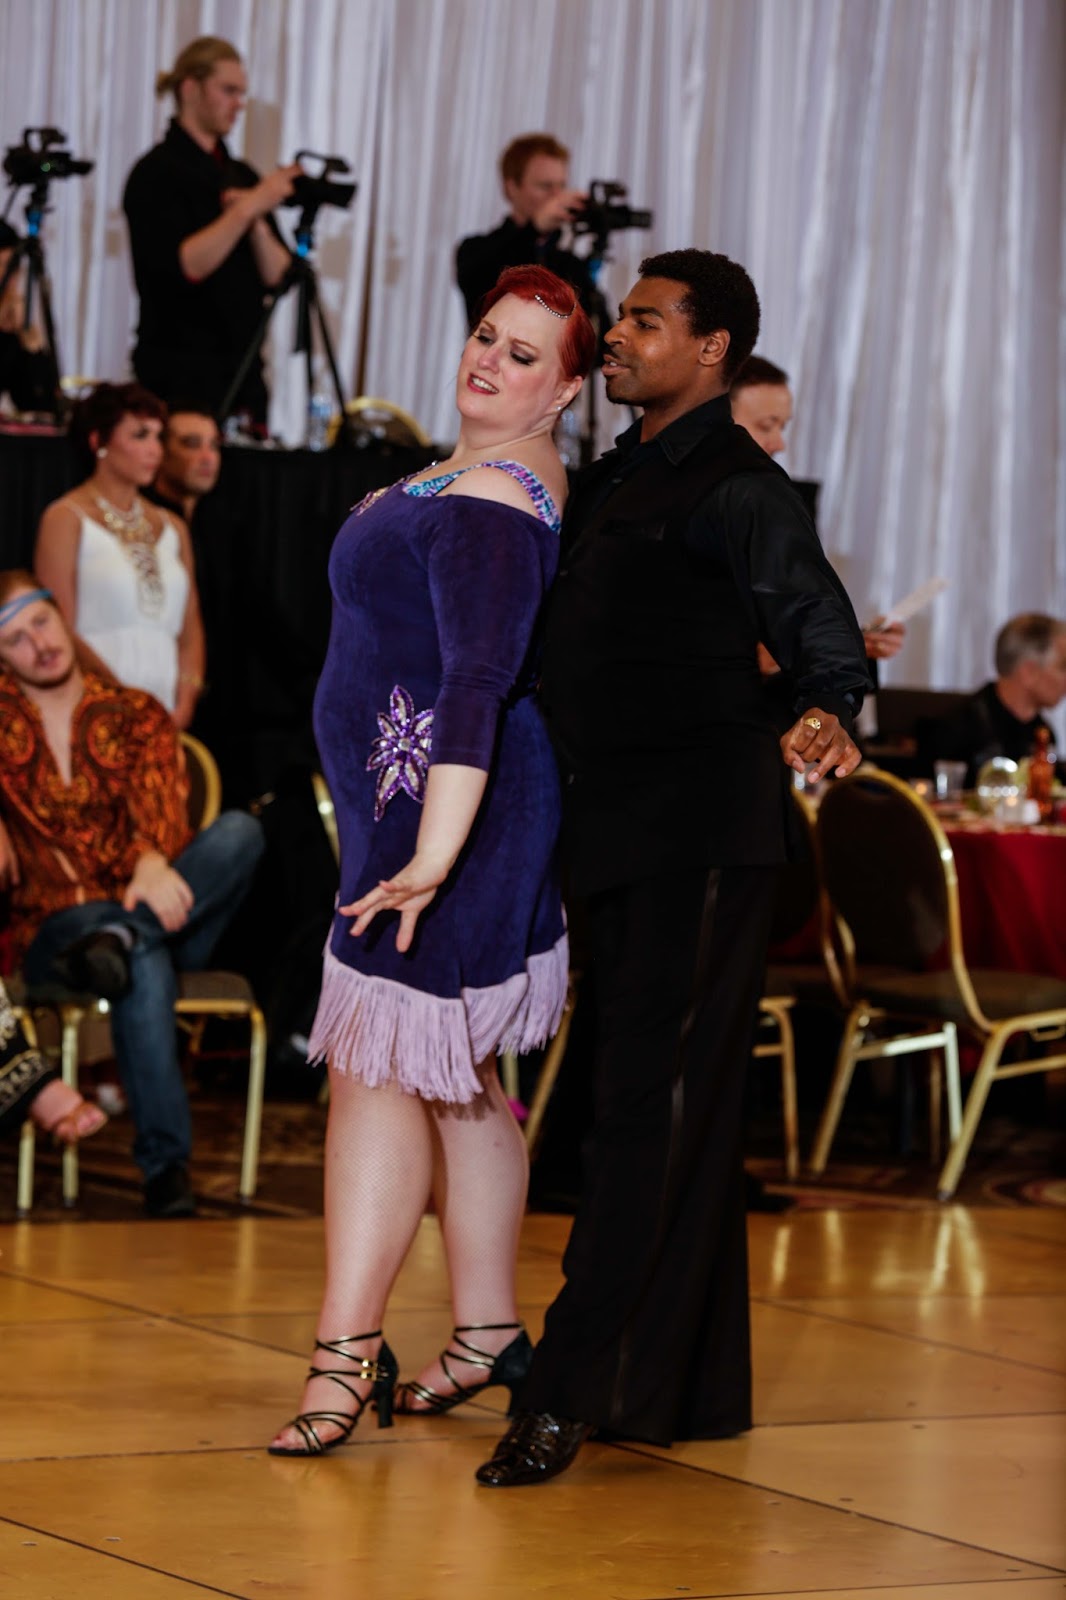
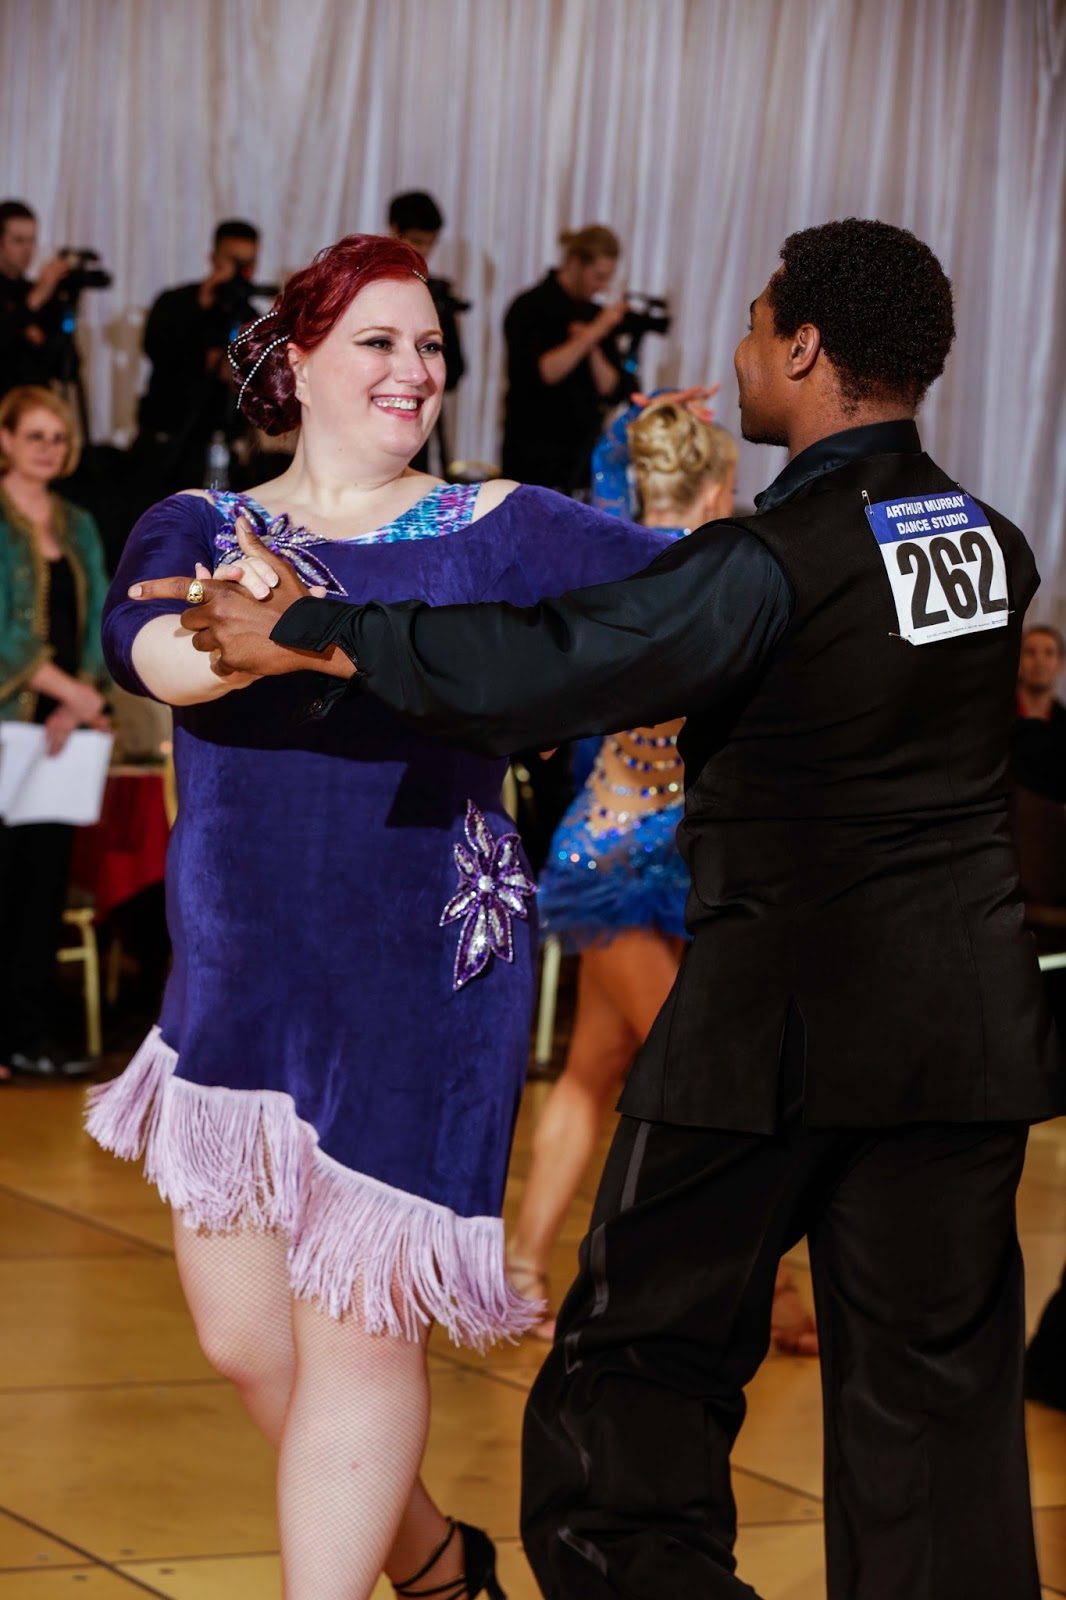
This post has been a long time coming. I mentioned a few times in the past that I wanted to put together a rhythm dress. Well, I put one together and wore it to my last dance competition.
This project all started with a dress made from a gorgeous purple slinky knit that I found in a thrift shop in Laguna Beach for $5.
Then I cut the bottom of the dress off asymmetrically.
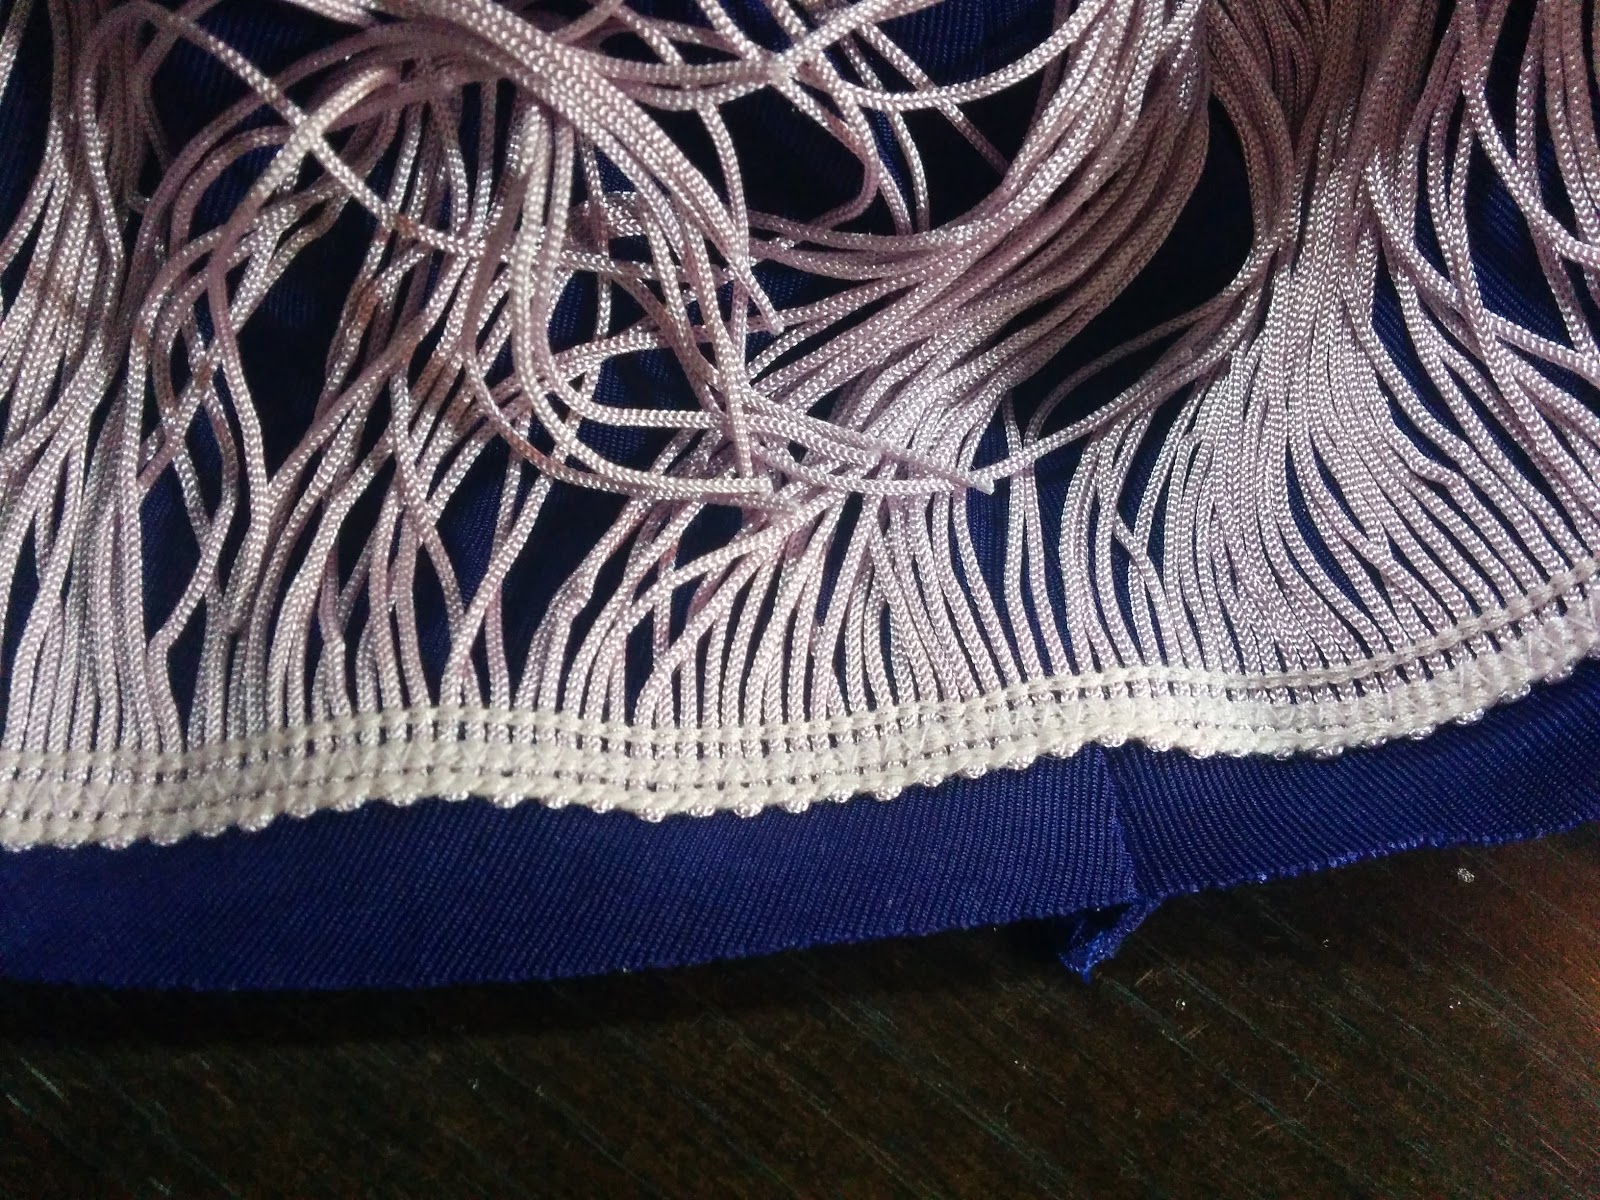
I purchased some 6″ lilac chainette fringe. I sewed a row on upside down about 1/2″ from the cut edge along the bottom edge of the dress with a zigzag stitch, right sides together.
I turned the edge under under to create the hem and then sewed a second row of the fringe just above the hemline, but close enough that I caught the turned up edge of the dress hold it in place.
So I ended up with two rows of fringe along the bottom of the dress, so it looks nice and full.
The fringe doesn’t stretch, so I was a bit concerned that the stitching might end up popping, but that part of the dress doesn’t end up getting stretched out and since it’s applied on an angle, there hasn’t been a problem yet.
For this to be a “proper” dance dress, it needs to have a built-in leotard. In comes Jalie Bella fit and flare dress pattern. The dress in this pattern is basically the same as the one I purchased — an armhole princess seamed fit and flare dress, but it has an optional leotard underneath.
I made what was basically a muslin of the leotard in a blue nylon/lycra activewear knit that I had in my stash. According to the pattern measurements, I needed to add 2″ to the length and that was the only alteration I did to the pattern. It fit perfectly, so I made it again in this swimwear knit that I purchased from Pacific Fabrics because it matched both the purple of the dress body and the lilac of the fringe. I used the blue muslin leotard as a lining to this leotard.
After trying them on together to see how it looked, I decided that I would like to open up the neckline more and make the purple dress sit off my shoulders and show off a little skin and a little more of the leotard fabric.
I also have discovered that, even though these dresses have a lot of stretch in them, I don’t want to pull them up over my head because I’ll end up messing up my hair and makeup that I sat and had done so beautifully by the wonderful professionals at these events. I designed my green Modern Nature smooth dance dress to pull on like a swimsuit, but the neckline ended up getting pretty stretched out after I decorated it with the rhinestones and pull it on that way a dozen or so times. So I’ve decided that I need to add zippers to my ballroom dresses from now on. So, I ripped open the back seam of the dress and added an invisible zipper. The dress and the leotard are joined at the zipper and I also sewed them together along the front where the purple dress comes straight across the front of the leotard.
Here’s a photo of me and my instructor Yaunique at the Portland DanceORama.
And here are a few action shots that the professional photographers at Maude Productions took at the Portland DanceORama
I have purchased some rhinestones and plan on decorating my new rhythm dress soon. I really like the way it looks now and I’m a little afraid that adding the rhinestones will detract from the simple beauty of the dress. But I also really want a super sparkly dress to wear too!
Edit 6/21: I forgot to add a link to one of my dance videos so you could see the dress in action. I have a few videos in this dress that you can see on my YouTube channel, but the Bolero is the only rhythm dance we actually have choreography for and the other Bolero video is to a cover of the M.I.A song Paper Planes, which just felt strange to dance to, even though Yaunique did actually remember to do the dip in that one. 🙂
I’m a little late on this post. This past week+ has been hectic and I haven’t had time for nearly all the things I had hoped to do. But better late than never.
First, I have one more outfit to show. I didn’t leave the house or get dressed either the 29th or the 30th, so I only have the one bad work bathroom selfie for the 31st to close out Me Made May ’16.
I really do like to make (and wear) dresses, mostly knits. I work in an industry where I can wear jeans/shorts and tees everyday, and I did for many years. But last year, at my previous job, I started wearing one or two of the dresses I made to work each week. When I quit my job last summer, I had a lot of free time to sew and by the time I started my new job in September, I had enough dresses to wear them almost every day. Knit dresses are comfortable to wear and I feel like they look better on my shape than jeans and tees.
I need cardigans and leggings! When the weather is a little cooler, I find I need to reach for RTW leggings and sweaters, so I need to start making some of those to help fill out my wardrobe.
I find it difficult to tell people I made my outfit. There are some people at work, specifically the ladies in my weight watchers group, who know I make a lot of my own clothes and will usually ask me, “did you make that?” But when I get a random compliment about what I’m wearing, I usually just say, “Thanks.” I wonder if I should say that I made it and if my husband is with me, he’ll brag on me that way. Do other people have that internal conflict when they get a compliment on a me-made item?
Wrap Up
I’m really glad I participated in Me Made May ’16. And I actually met my goal. I even had a few more options that I could have worn if I hadn’t been so lazy on the weekends. That actually surprised me. I’ll definitely be planning on participating next year too!
I didn’t include this as part of my original pledge, but I’m trying to see I can go the entire month without repeating outfits. I’ve made it so far, but barely and only because I’ve made a couple dresses during the month.
Here are my week 3 outfits.
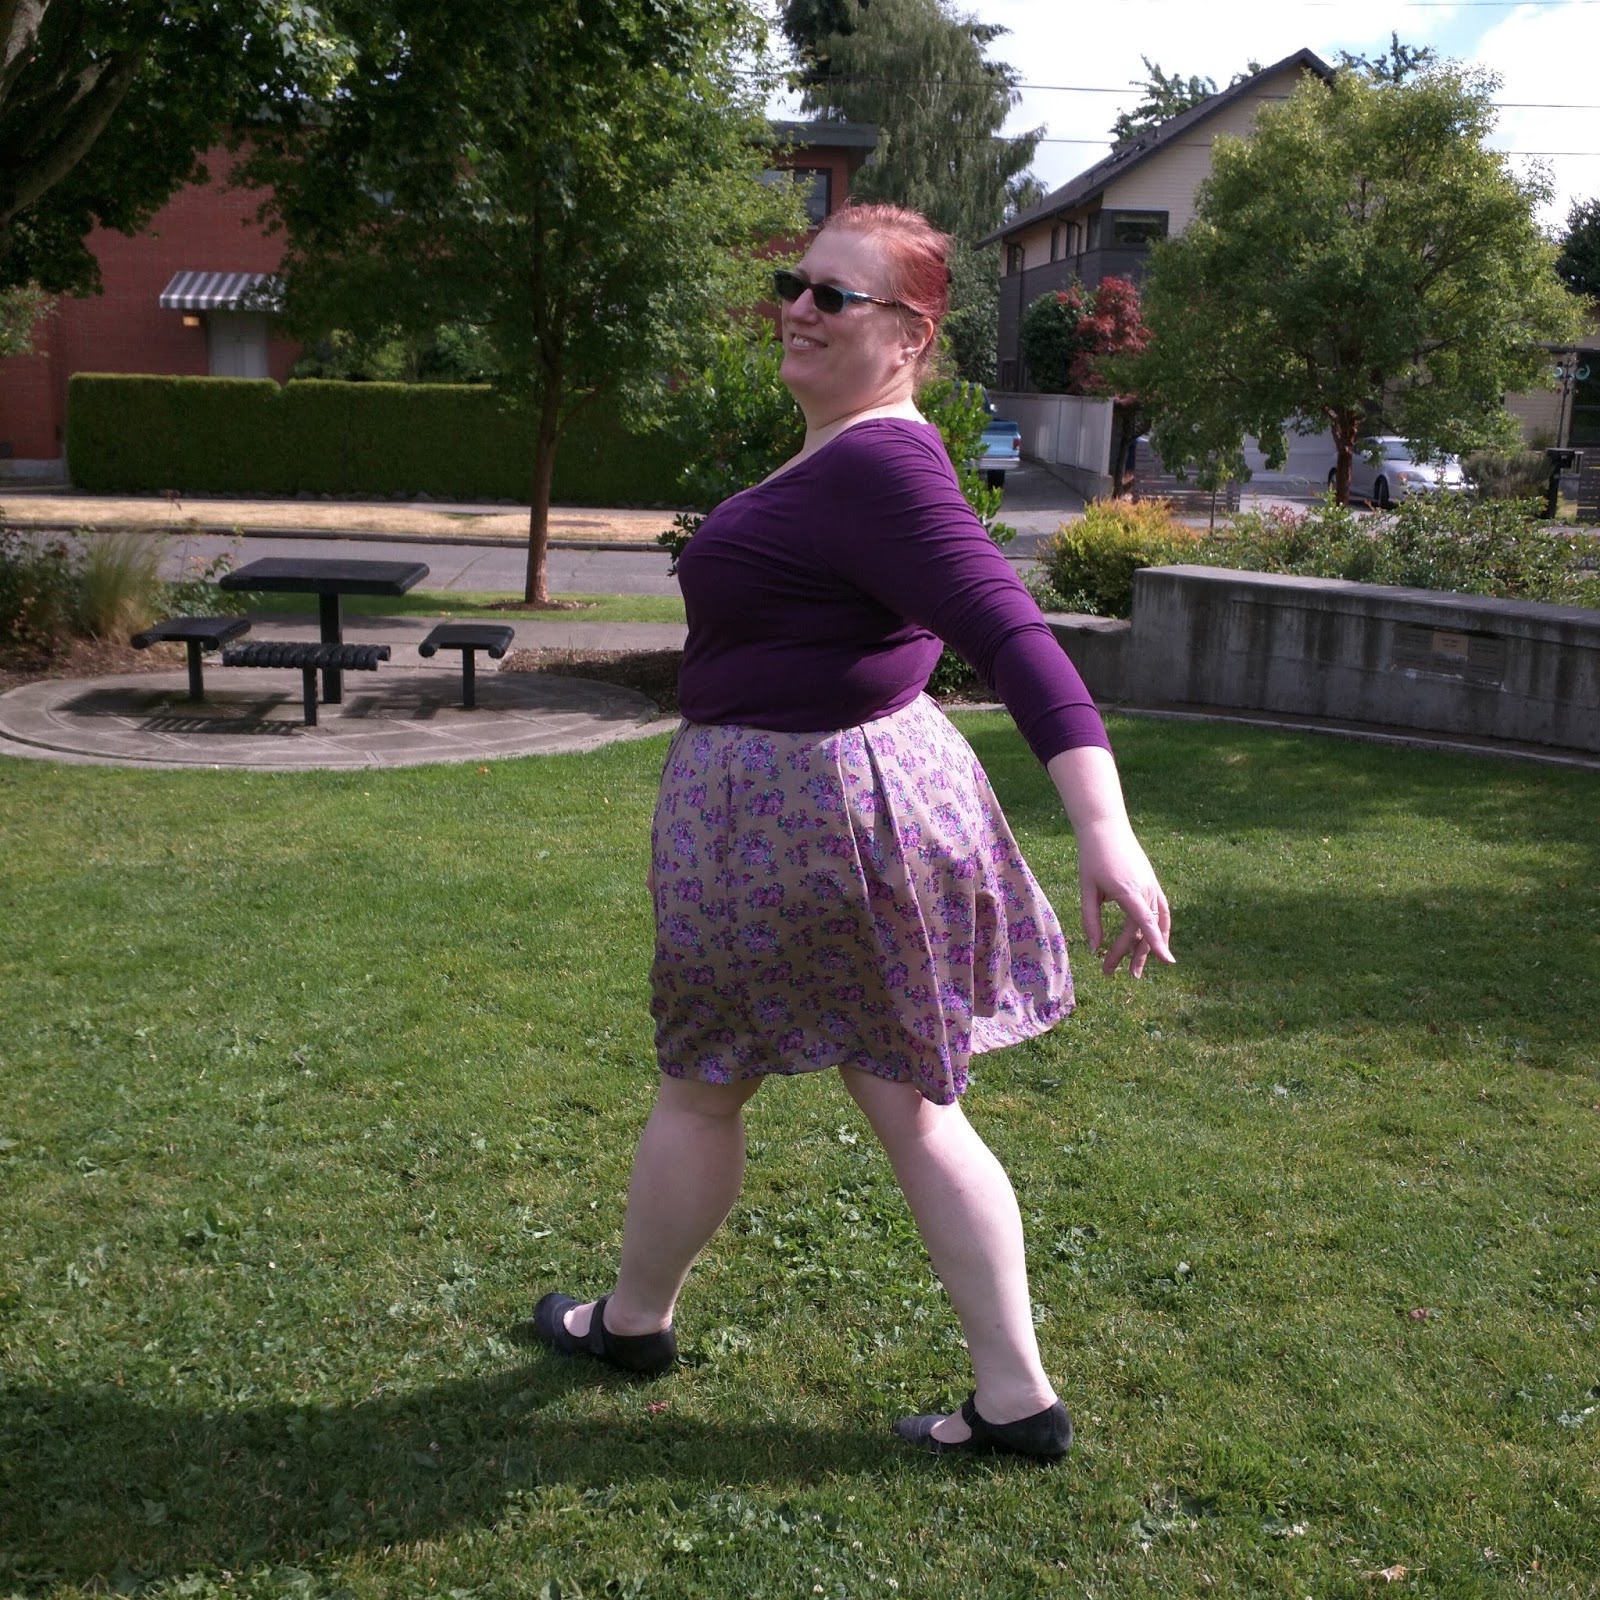
Sunday, May 22
I think you can start to see a trend here. Sunday’s are my lazy days. I often do go out to brunch or something, but this month so far, we haven’t been.
On to the bad work bathroom selfies for the week.
Monday, May 23
Greenstyle Laurel cut at the shorter length with RTW leggings.
Tuesday, May 24
Today I’m wearing my second Ottobre Optic Flowers dress I raised the waistline piece about an inch and I think it sits better than the first one. Although, my preference would be for it to be even higher. But then it wouldn’t be a dropped waist dress anymore. Lol.
Wednesday, May 25
This is another Lady Skater that I made at the end of last year.
Thursday, May 26
This is a Seamwork Mesa that I wasn’t pleased with. But since I’ve lost a little weight, I think it looks better on me now. But I still probably won’t be making anymore of these.
Friday, May 27
Butterick 5950 that I made last summer while I was unemployed.
Saturay, May 28
Saturday we went up to Port Moody, BC to watch my daughter’s lacrosse game. She’s been playing goalie since she was little and Canada has women’s indoor lacrosse leagues that we don’t have here in the states, at least not in Washington. She was playing in the upper age division because their goalie got a concussion and is out for the rest of the season. She had 36 shots on her goal and didn’t let a single one in. She told me afterwards that no one thought they would win against this team and the captain was preparing her for a horrible loss. But her team won 3-0.
This photo was taken at a sushi restaurant my husband and I went to before the game. Not the best photo of my outfit, but in all the excitement I forgot to have him take more. I’m wearing black RTW leggings that you can’t see, with a Love Notions Laundry Day Tee that I made with a white and black pinstripe fabric that I dyed purple.
May is inspiration month at The Monthly Stitch. I have noticed that I have many dresses made out of fabric with lovely prints. So, the easiest way for me to put together an outfit is to make leggings and/or cardigans in solid colors, neither of which I’ve successfully made yet (perhaps foreshadowing IPM…?) So, as I was looking through TMS archives to find an inspirational post, this one for Rosemary’s Fabulously Red Lady Skater caught my eye. It’s a solid color, it’s my favorite dress pattern, it’s red, which I’ve traditionally avoided wearing, but lately have been told I should wear it more often. So that seemed like a perfect dress to copy. Especially since I even already had fabric on hand.
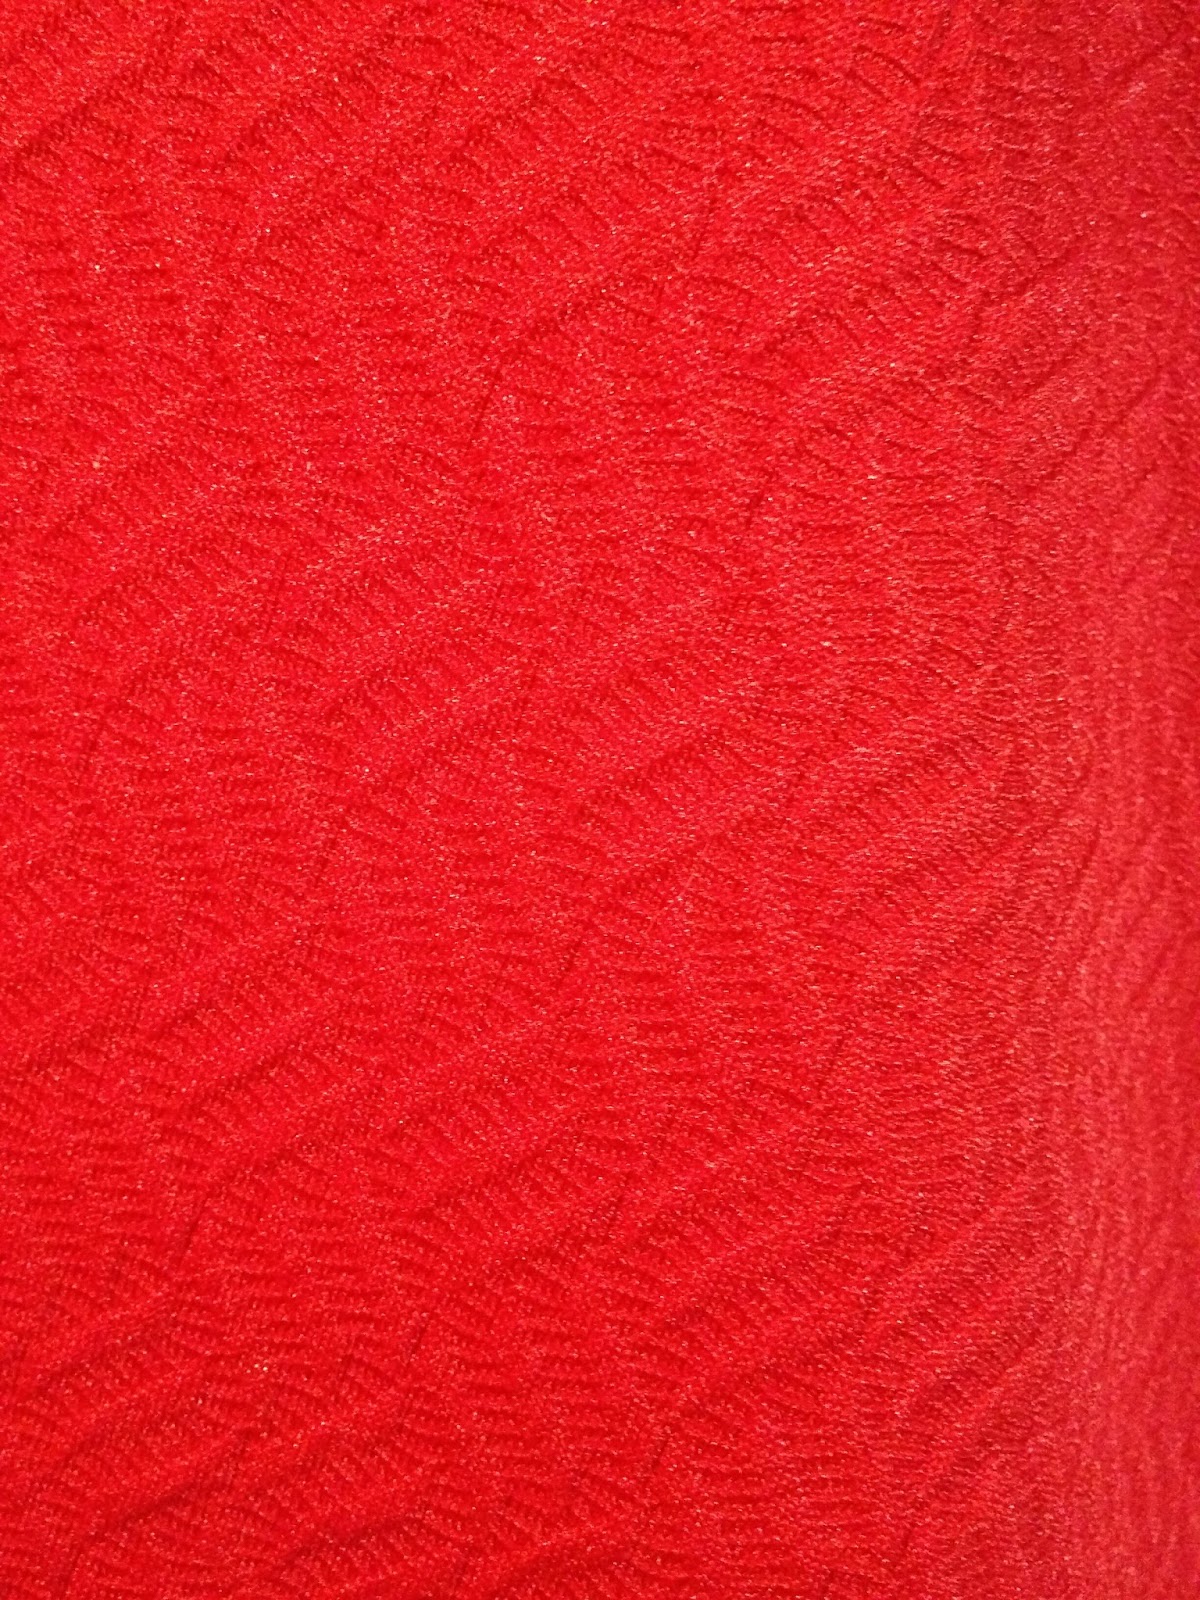
I had recently picked up some Rose Red Poly/Lycra Abstract Jacquard Double Knit from Fabric Mart with the intention of making myself a red dress.
And here’s a photo I took of it to show off the texture.
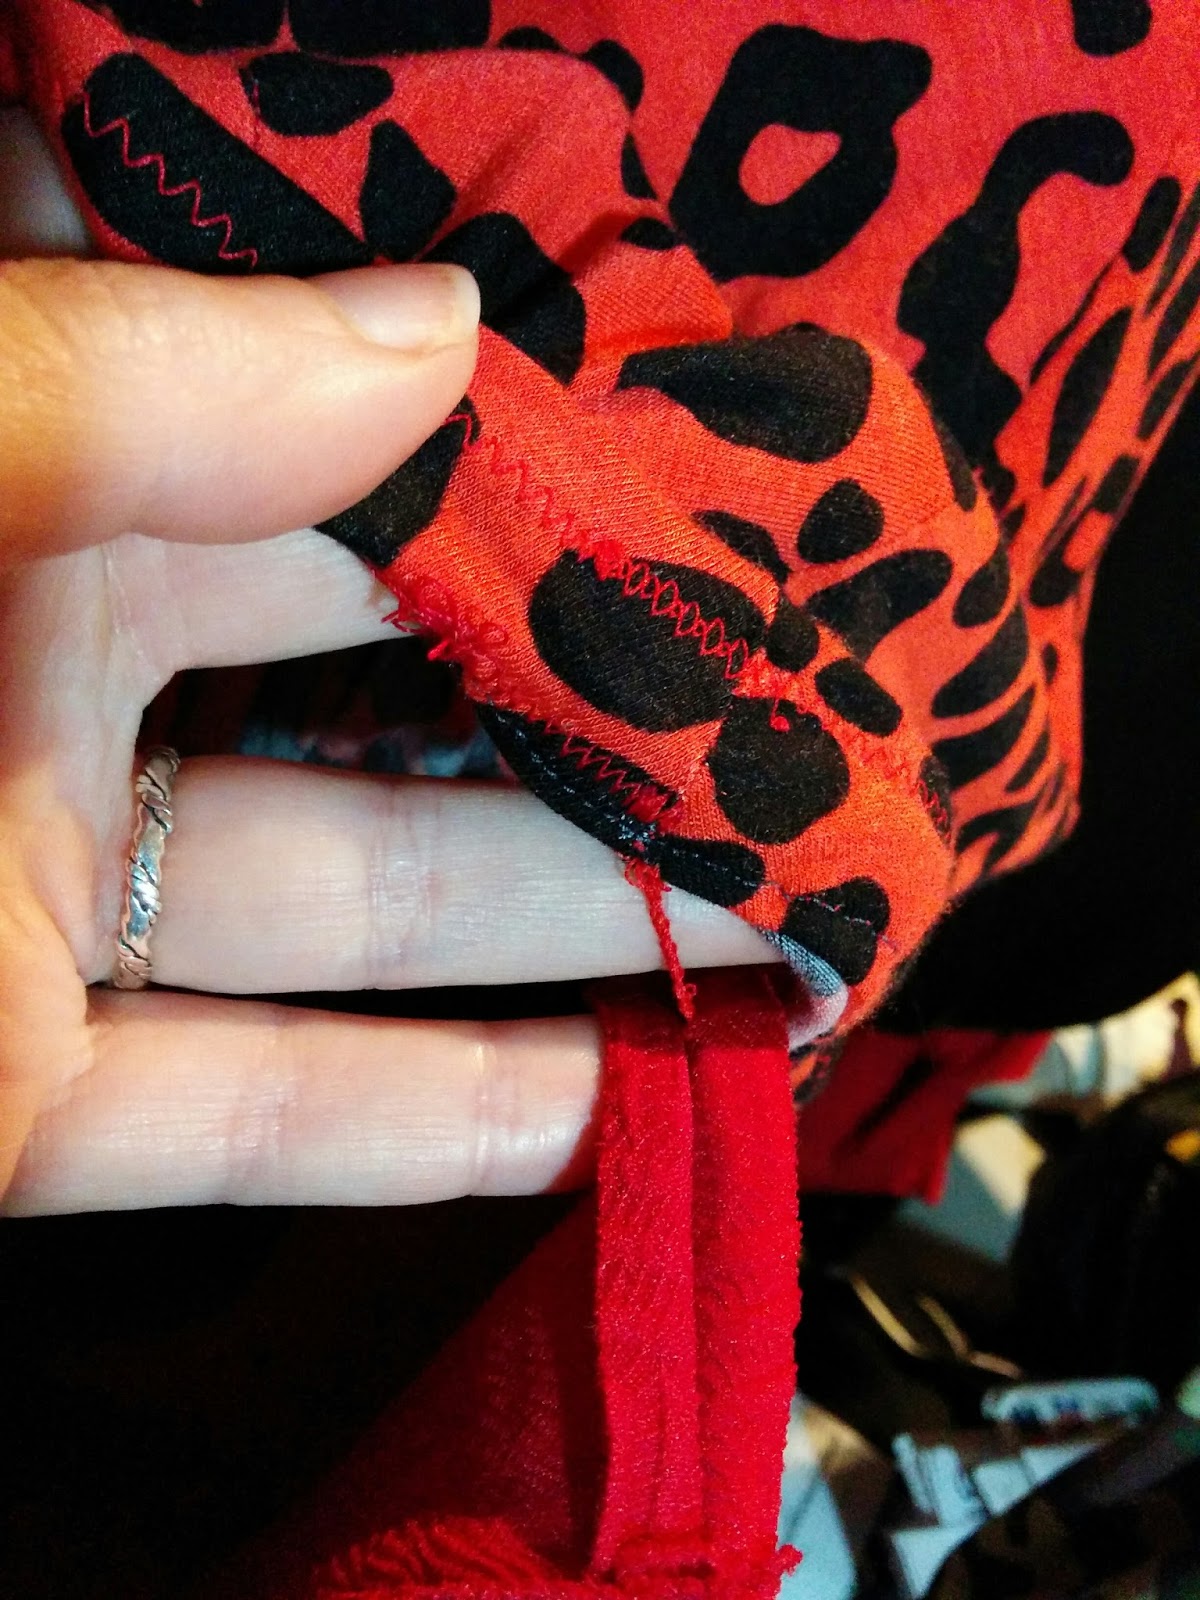
I’ve made the Kitschy Coo Lady Skater several times, but I tried something a bit different with this one. The fabric is a bit scratchy, so I decided to line it with something that would feel better against my skin. So I chose a very soft black and red animal print rayon blend jersey that I picked up from a flawed fabric bargain lot from Girl Charlee. At first I only planned to line the bodice, but as I was constructing it, I thought about how the waist seam would end up being itchy and the dress being on my legs sitting at my desk all day might bug me too, so I cut the skirt pieces too. I sandwiched the pieces together at the waist seam, as I did with the plaid version I made at the end of last year. I didn’t line the sleeves, but my insides were looking so good that I thought maybe I would try a French seam to attach the sleeve. This red fabric is pretty thick, so both of those plans were just terrible ideas. Granted, I didn’t clip the curve of the sleeve seam, but still, the thickness of the French seam made the shoulder look bumpy and very bad. Luckily, I only did one before I realized it was a mistake. As for the waist seam, I just felt like the seam was too visibly bulky with all 4 fabrics joined together like that, and all 4 steam allowances all bunched up together. So I started ripping out seams. Which added a week to this project. Mostly because I pouted some for a while at the fact that I had to do so much seam ripping and also because the lighting in my comfy spots are terrible for being able to rip out stitching that so closely matches the thread to the fabric. But I did find some daylight times to be able to do it eventually. Once I reassembled the dress with the lining hanging completely separate, the dress looked so much better constructed than it did previously. And I just love how it looks on the hanger with the black and red animal print peeking out.
Here’s the finished dress inside out on my dress form.
I even added French tacks to keep the lining from shifting around too much. I followed this tutorial from Ohhh Lulu.
And here I am wearing it out in the driveway.
My husband and I walked down to the park at the end of the street to take these photos. Not many turned out very great. Here’s me doing my best Vanna White impression.
And this one was me trying to act shocked in response to my husband making some crack about how he’s stalking me in the woods. My new glasses have transition lenses, so I don’t really notice them changing and am always surprised to see I’m wearing sunglasses in my photos. haha.
Again, I didn’t leave the house and I just lounged around sewing and planning. I cut out a red Lady Skater with a full lining for the May Monthly Stitch challenge, and I thought it would be a quick make, but I messed up trying to get fancy with the sleeve insertion and I have a lot of stitching to rip out now. I’ve not had a chance to get it done during the day when the light is good. But I identified a problem that I need to resolve — better lighting in my living room next to where I want to sit and do the hand work (ripping, catch stitching, etc.)
Now what you’ve been anxiously awaiting, the awesome work bathroom selfies for the week.
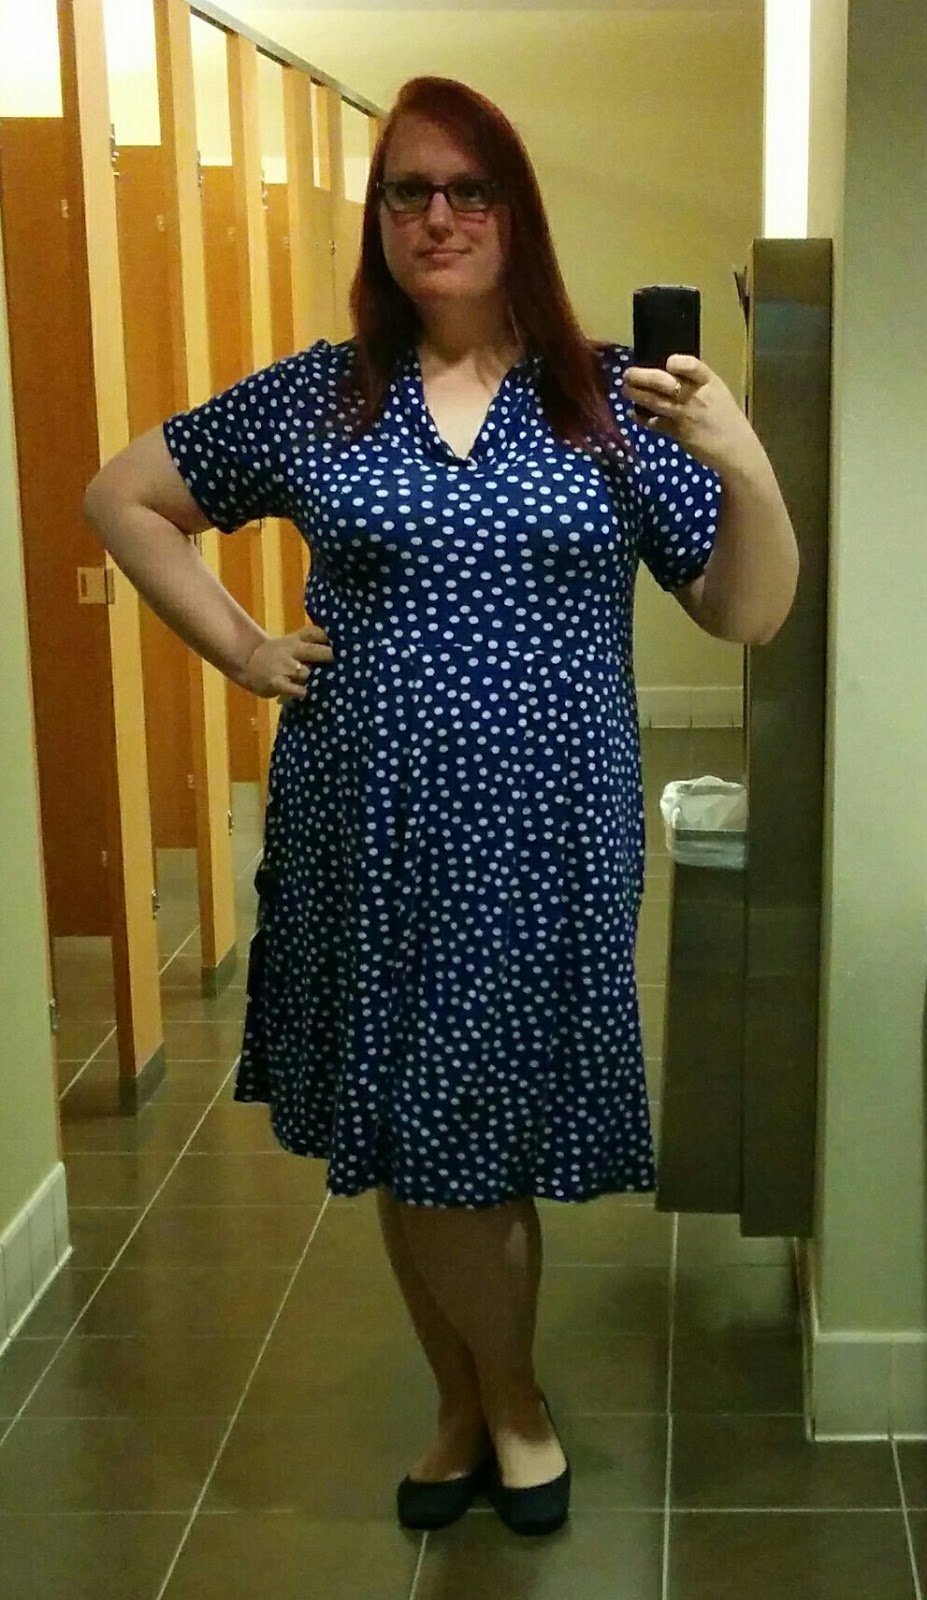
Monday, May 16
Sew Straight and Gather Uptown/Downtown dress. This was the wearable muslin I made from some Girl Charlee (affiliate link) flawed bargain lot fabric. I love this dress, but the fabric is very thin, so I have to wear a slip with it. I should have fully lined it.
Tuesday, May 17
This is a self drafted 6 panel skirt. I had this fabric from some point in my way-back past and I think there was about a yard and a half. I calculated a pattern for a 6 panel circle skirt, but I didn’t have enough fabric for that, so I trimmed the edges down until I could fit 6 panels onto my fabric, matching the plaid horizontally.
I pretty much always wear this skirt with this Coheed and Cambria concert tee because the colors match really well and also because I love to promotemyfavoriteband.
SisBoom Megan with a nice 70s vibe. I got many compliments on this dress. One from a guy at work and many from people at my dance studio. I think maybe that was because it’s so short! I did wear a pair of white Old Navy shorts underneath, even at work, just to feel confident I wouldn’t flash anyone.
Now that I’ve actually worn it, I have some additional thoughts that didn’t occur to me when I wrote up my original blog post. I like the bell sleeves, but as you can see in the photo, you can often see the inside of the sleeve, which just bothers me for some reason. And the construction method of the sleeves calls for a bias strip sewn to the sleeve up in the bicep area to make a casing for the elastic. I think if I were to make this dress again with the bell sleeves, I would make the upper sleeve and lower sleeve two separate pieces and sew them together to create the elastic casing and line the lower sleeve so that it would look good from any angle.
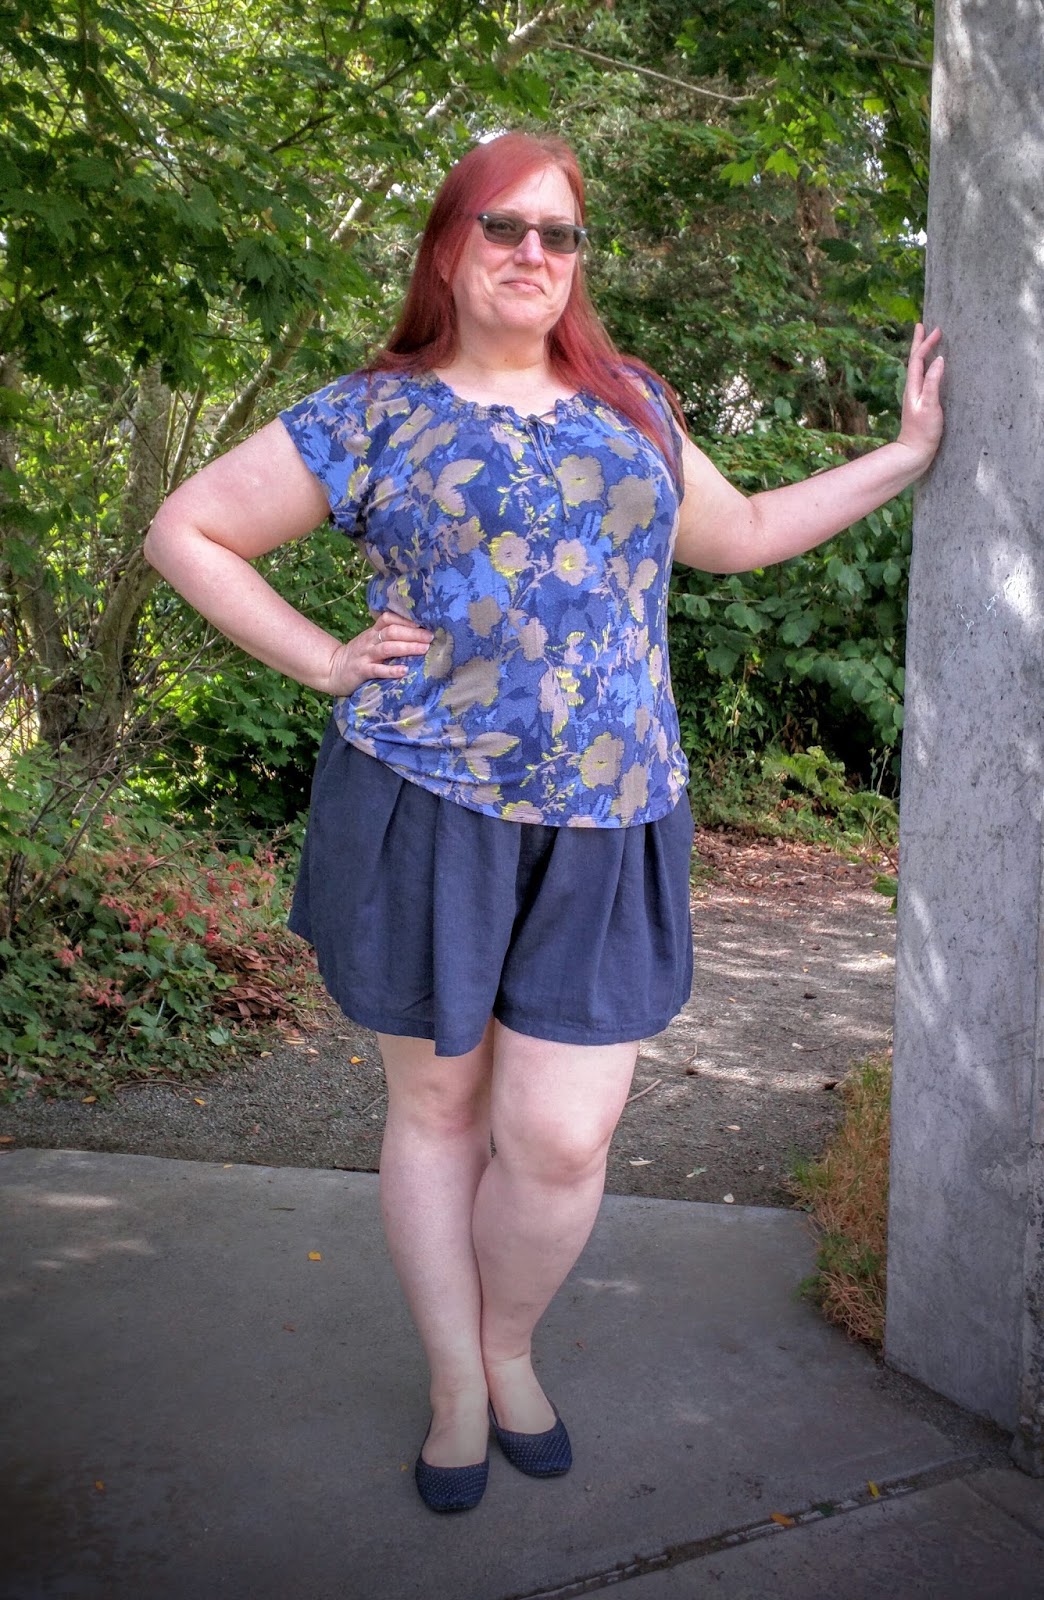
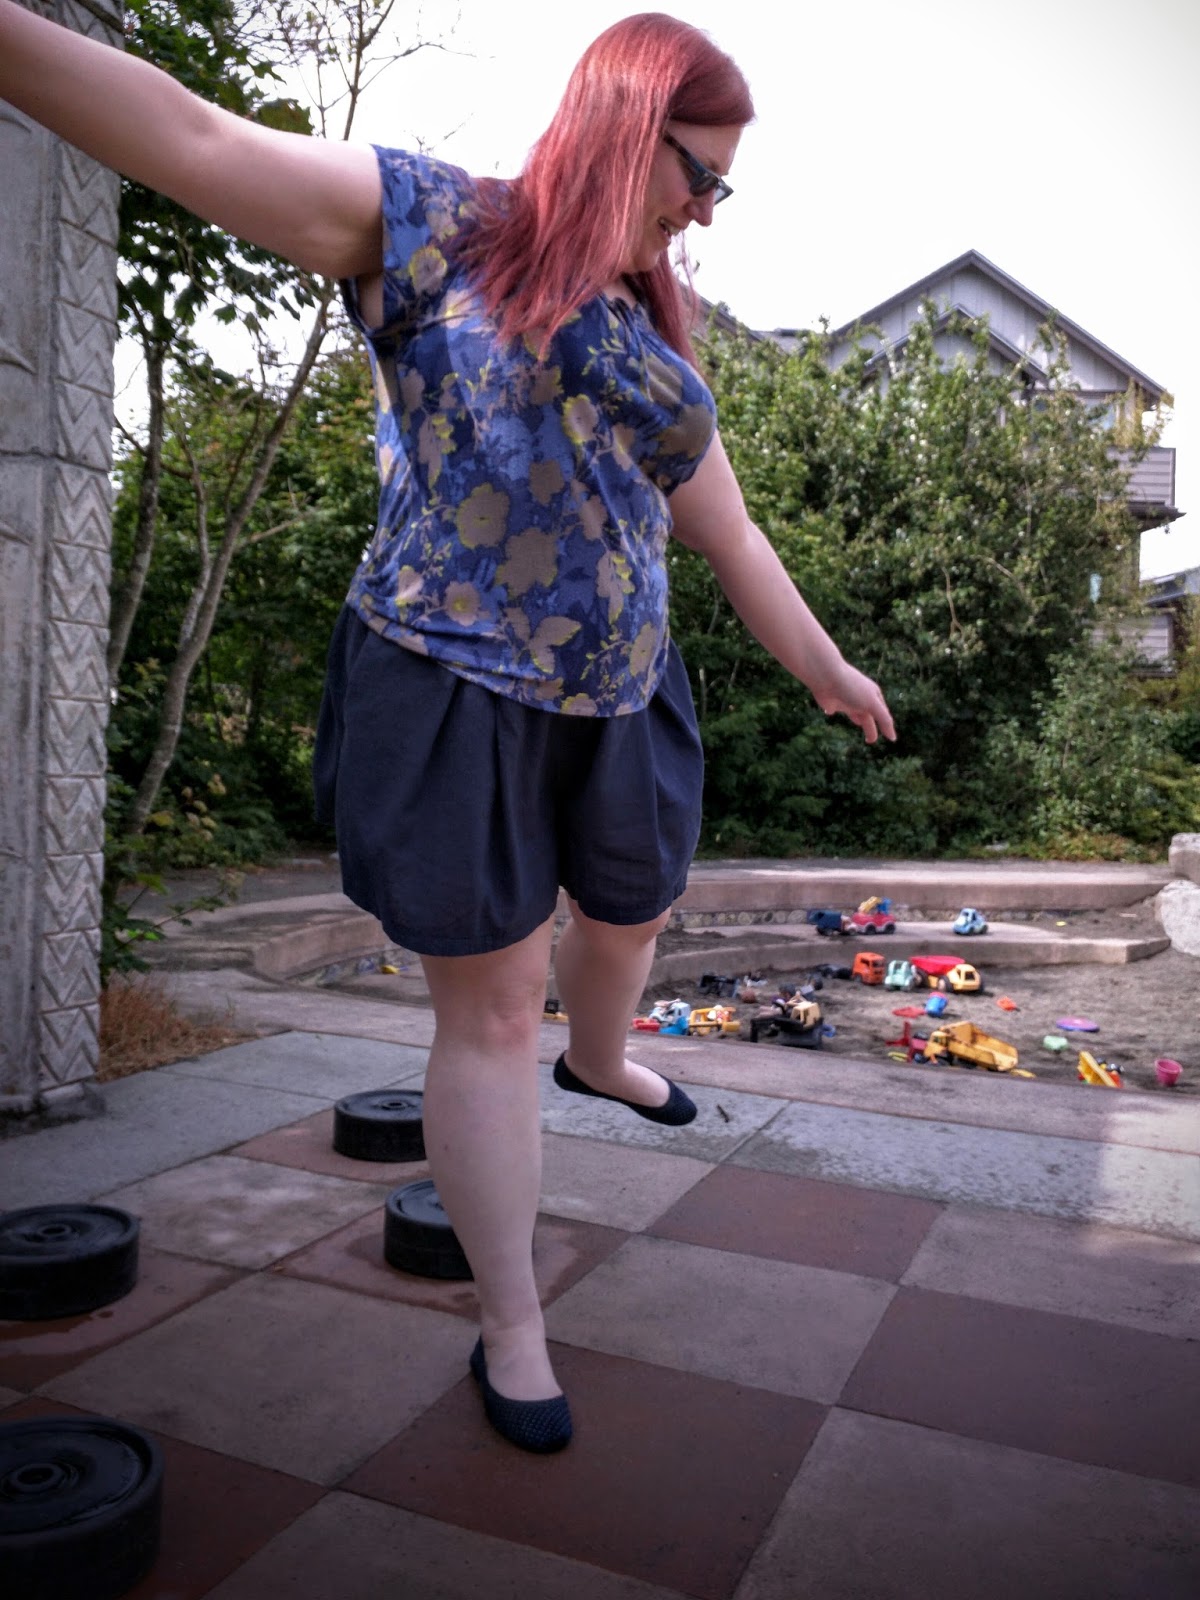
Seamwork Moji. I’m not very fond of these pants and I think the fabric I used makes them look like hospital scrubs, but I wore them to brunch on this chilly morning. The place we went to is partially open and a cool breeze would waft in occasionally, so I stayed all bundled up the entire time.


Recent Comments